Let me guess. You grabbed whatever wire was in your garage, hooked up your solar panels, and now you’re wondering why your power output looks like a sad trickle instead of the mighty river you expected. Welcome to the club. I once tried using leftover speaker wire for a 12V system and wondered why my panels were barely charging anything. Turns out, solar wire gauge matters more than I thought.
Here’s the thing nobody tells you upfront: wrong wire thickness will silently sabotage your entire solar setup. Your panels might look perfect, your charge controller might be humming along, but if you’re pushing electricity through wire that’s too thin, you’re losing power faster than a leaky bucket loses water.
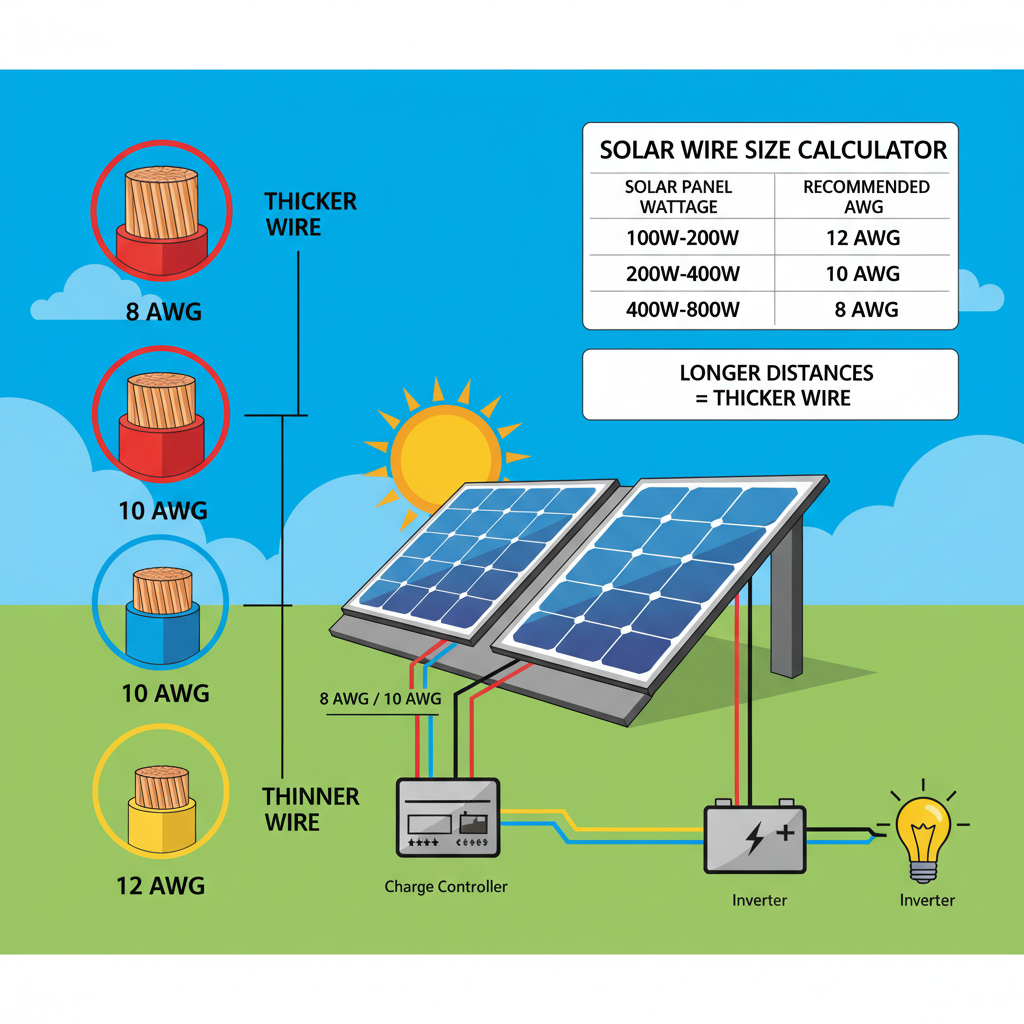
Why Solar Wire Gauge Actually Matters
Think of electrical wire like a garden hose. Try pushing water through a straw instead of a proper hose, and you’ll get a pathetic dribble. Same principle applies to electricity.
When wire is too thin for the current you’re pushing through it, two bad things happen:
First, voltage drop. Your 12V system might only see 10V by the time it reaches your battery. That’s not just inefficient—it can prevent proper charging entirely.
Second, heat. Thin wire carrying too much current gets hot. Hot enough to melt insulation, start fires, or just slowly cook itself to death over time.
I learned this the expensive way when my “temporary” undersized wire setup turned semi-permanent. Six months later, I found sections that were literally warm to the touch. Not exactly the kind of excitement you want from your solar setup.
Solar Wire Gauge Calculator: The Simple Formula
Here’s the good news: calculating proper wire gauge isn’t rocket science. You need three numbers:
- Current (amps)
- Distance (feet)
- Acceptable voltage drop (usually 3%)
The basic formula is: Wire Size = (Current × Distance × 2) ÷ Voltage Drop
That “× 2” accounts for the round trip—electricity has to travel out to your load and back again.
For example: 20 amps running 50 feet in a 12V system with 3% voltage drop:
(20 × 50 × 2) ÷ 0.36 = 5,556 circular mils
That translates to 8 AWG wire. Anything smaller and you’re in trouble.
Quick Reference Wire Gauge Chart
Because nobody wants to do math at 7 AM when you’re trying to wire panels:
| Distance | 10A | 20A | 30A | 40A |
|---|---|---|---|---|
| 10 feet | 14 AWG | 10 AWG | 8 AWG | 6 AWG |
| 25 feet | 12 AWG | 8 AWG | 6 AWG | 4 AWG |
| 50 feet | 10 AWG | 6 AWG | 4 AWG | 2 AWG |
| 100 feet | 8 AWG | 4 AWG | 2 AWG | 1/0 AWG |
This assumes 12V DC with 3% voltage drop. For 24V systems, you can go one wire size smaller for the same current and distance.
Common Wire Gauge Mistakes That Kill Performance
Let me save you from the mistakes I’ve seen (and made) over the years:
The Extension Cord Trap: That heavy-duty 12 AWG extension cord looks perfect for solar, right? Wrong. Extension cords use stranded wire with thin individual strands. Solar wire uses thicker strands designed for DC current. Extension cord wire degrades faster in outdoor conditions.
Moreover, if you’re running higher current from multiple panels, that 12 AWG won’t cut it for longer runs.
The “It’s Only Temporary” Delusion: Temporary installations have a way of becoming permanent. That undersized wire you threw up “just for testing” will still be there two years later, quietly stealing your power.
Ignoring Temperature Rating: Regular THHN wire is rated for 90°C. But stick it in direct sunlight on a hot roof, and temperatures can hit 150°F or more. Use THWN-2 or proper solar wire (USE-2) rated for wet locations and higher temperatures.
AC vs DC: Why Your House Wiring Knowledge Doesn’t Apply
If you’ve done any household electrical work, forget what you know about wire sizing. DC systems play by different rules.
AC current alternates direction 60 times per second, which helps reduce resistance issues. DC current flows one direction constantly, creating more heat and requiring thicker wire for the same power.
Plus, DC systems often run at lower voltages than household AC. Remember, power equals volts times amps. Lower voltage means higher current for the same power. Higher current means thicker wire.
This is why proper inverter sizing matters—it affects your entire wire sizing calculation.
Special Considerations for RV Solar
RV installations come with their own headaches. You’re dealing with:
- Vibration that can fatigue wire over time
- Limited space for thick wire runs
- Temperature extremes from desert to mountain conditions
For RV systems, I always recommend going one wire size bigger than calculated. The extra cost is minimal, but the peace of mind is priceless. Especially when you’re mounting panels on the roof and running wire through tight spaces.
Professional Wire vs Hardware Store Wire
Here’s where I’ll probably sound like a broken record, but proper solar wire is worth the extra cost.
Hardware store THHN wire works for indoor DC applications. But solar installations live outside, exposed to UV, moisture, and temperature swings that would kill regular wire in a few years.
USE-2 or XHHW-2 wire costs maybe 20% more but lasts decades longer. The copper stranding is designed for DC current, the insulation handles UV exposure, and it’s rated for wet locations.
I’ve seen too many systems fail because someone tried to save $50 on wire while spending thousands on panels and batteries. Don’t be that person.
Testing Your Wire Installation
Once your wiring is complete, test it before connecting expensive equipment. You’ll need a multimeter and a basic load (like a small inverter or DC lights).
Measure voltage at your panel, then at your charge controller or battery. Under load, you shouldn’t see more than 3% voltage drop. If you do, your wire is too small or you have a connection problem.
Also check for hot spots along wire runs during operation. Any wire that’s noticeably warm needs investigation. It might be undersized, or you could have a loose connection creating resistance.
Remember, proper fuse and breaker sizing protects your wire from overcurrent conditions that could cause dangerous heating.
The Bottom Line on Solar Wire Gauge
Getting solar wire gauge right isn’t glamorous. Nobody’s going to admire your perfectly sized copper runs like they would your shiny new panels.
But proper wiring is what separates systems that work reliably for decades from systems that limp along, underperform, and eventually fail in expensive ways.
Take the time to calculate wire size properly. Buy quality wire rated for the application. Test your installation before connecting expensive components. Your future self will thank you when your system just works, year after year, without the drama of voltage drops and overheating wires.
Trust me, there are enough variables in solar to worry about without adding “will my wiring catch fire” to the list.