I learned about solar shade analysis the hard way. Spent two weekends installing panels on what looked like a perfect south-facing spot. Turned out my neighbor’s oak tree had other plans. Come winter, those branches cast shadows for half the day. Don’t be me.
Here’s how to map your property like a pro before you buy a single panel.
Why Solar Shade Analysis Matters (More Than You Think)
Solar panels hate shade. Even partial shade on one panel can kill the output of an entire string. It’s like having one slow runner drag down your whole relay team.
Most people eyeball their yard and call it good. Bad move. Shadows change throughout the day and seasons. That perfect sunny spot in July might be a shadow zone in December.
Professional site surveys cost $200-500. But you can do your own solar shade analysis with basic tools and some patience. Plus, you’ll actually understand your property’s sun patterns instead of trusting someone else’s quick assessment.
Tools You Need for DIY Shade Mapping
Don’t worry, you won’t need fancy equipment. Here’s what actually works:
Free Tools:
- Your smartphone camera
- Google Earth or satellite view
- A simple compass app
- Notebook and pen (old school works)
Helpful Upgrades:
- Solar pathfinder app ($10-20)
- Shadow stick (any straight stick works)
- Basic sun calculator (free online)
I’ve tried expensive tools. They’re not worth it for DIY projects. Your phone and eyeballs will do 90% of the work.
Step 1: Identify Your Potential Solar Zones
Start by walking your property. Look for areas that get obvious sun during midday. Don’t overthink this part.
Mark potential spots on your phone or sketch them out. Consider:
- South-facing areas (best in Northern Hemisphere)
- Open spaces away from tall trees
- Roof sections without dormers or chimneys
- Ground areas you don’t mind using
Ignore east and west-facing spots for now unless you’re desperate. North-facing areas are basically useless for solar (unless you live in Australia).
Once you nail down your solar shade analysis, you’ll want to calculate your actual power needs to size your system properly.
Step 2: Map Daily Shadow Patterns
This is where patience pays off. You need to track shadows throughout one full day. Pick a clear day, preferably during shoulder seasons (spring or fall).
The Shadow Stick Method:
- Place a straight stick vertically in your potential solar zone
- Every 2 hours from 8 AM to 6 PM, mark where the shadow falls
- Take photos of each shadow position
- Note the time and shadow length
Do this for each potential location. Yes, it’s tedious. Yes, it’s worth it.
Pro tip: Use spray chalk to mark shadow lines. It washes away but lasts long enough to see patterns.
Step 3: Account for Seasonal Changes
Here’s where most DIYers mess up. Summer shadows are short. Winter shadows are long. That tree that barely touches your solar zone in July might completely cover it in December.
The sun’s path changes dramatically between seasons. In winter, it travels lower across the southern sky. In summer, it’s nearly overhead at noon.
Quick seasonal check:
- Summer solstice: Shortest shadows, highest sun
- Winter solstice: Longest shadows, lowest sun
- Spring/fall equinox: Middle ground for both
Use online sun calculators to predict shadow lengths for different times of year. Punch in your location and get exact sun angles for any date.
Understanding Solar Window Requirements
Your panels need unobstructed sun during peak hours (roughly 9 AM to 3 PM). This is called your “solar window.”
Partial shade outside these hours isn’t ideal, but it won’t kill your system. Shade during peak hours will.
The 6-hour rule: If your potential location gets 6+ hours of unshaded sun during peak times, you’re probably good. Less than 4 hours? Look elsewhere.
Remember, you’ll need proper wire sizing once you determine your panel locations. Check out our wire gauge calculator guide to avoid voltage drop issues.
Common Shade Culprits to Watch For
Trees are obvious. But other things cast shadows too:
Sneaky shade makers:
- Neighbor’s buildings or trees
- Your own roof features (chimneys, dormers, vents)
- Power lines
- Hills or elevated terrain
- Future construction (yours or neighbors’)
That last one bit me hard. Neighbor built a two-story addition that shaded my perfectly planned array. Always ask about upcoming construction projects.
Digital Tools That Actually Help
Google Earth is surprisingly useful for solar shade analysis. Switch to satellite view and use the historical imagery to see how vegetation has changed over time.
Useful features:
- Measure distances to shade sources
- Check building heights
- See property from different angles
- Track tree growth over years
Solar pathfinder apps can predict shadow patterns without waiting around all day. They’re not perfect, but they’re close enough for most DIY projects.
When to Compromise (And When Not To)
Perfect solar sites don’t exist for most of us. You’ll need to make trade-offs.
Acceptable compromises:
- Morning or evening shade (outside peak hours)
- Slightly sub-optimal orientation
- Small objects causing brief shadows
Deal breakers:
- Midday shade during any season
- Large trees that will grow bigger
- Buildings casting long shadows
- North-facing locations (in Northern Hemisphere)
If your best spot still has shade issues, consider ground-mounted systems or adjustable tilt mounts that let you optimize for seasons.
Document Everything for Future Reference
Take photos of your solar shade analysis from multiple angles. Include timestamps and notes about shadow sources.
This documentation helps when you’re ready to install. It also proves useful if you need to trim trees or negotiate with neighbors about vegetation.
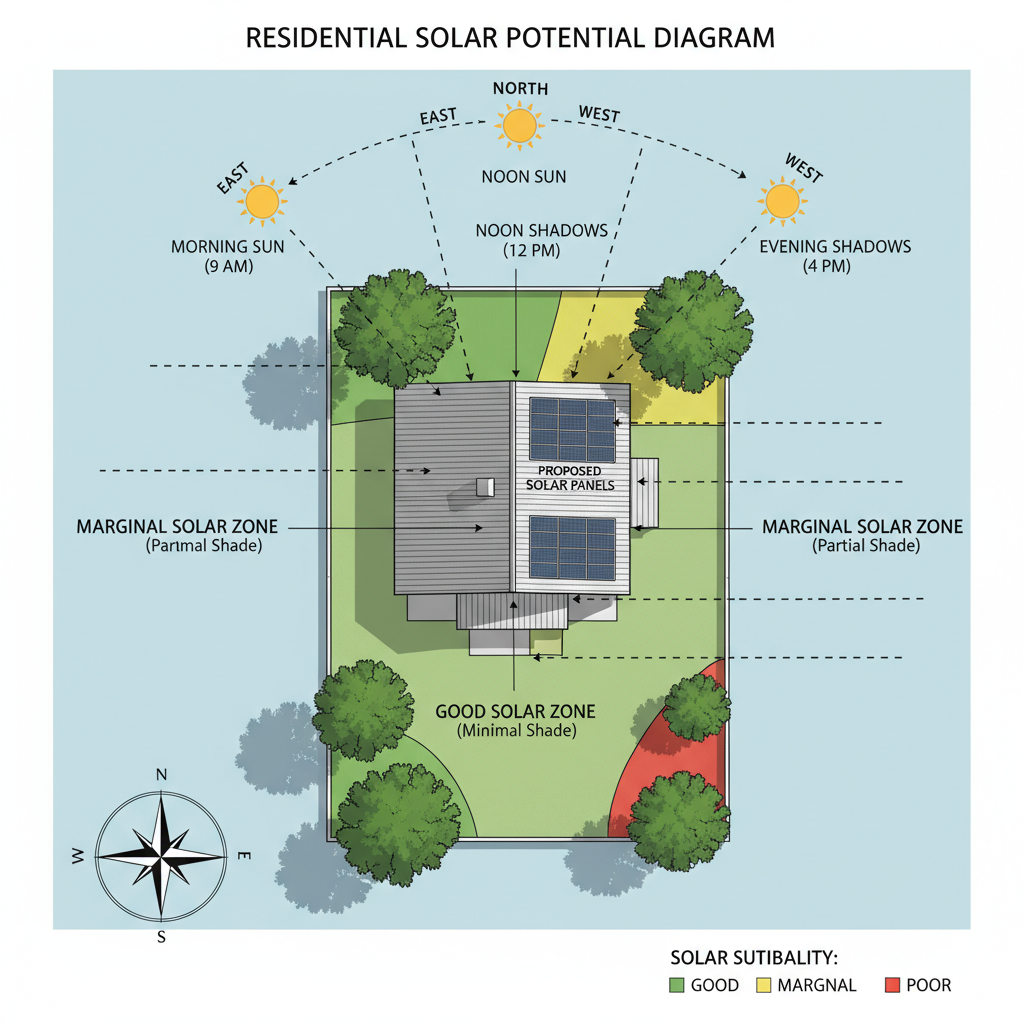
Create a simple map showing:
- Potential panel locations
- Major shade sources
- Sun path throughout the day
- Seasonal variations
Trust me, you’ll forget details between planning and installation.
Next Steps After Your Shade Analysis
Once you’ve mapped your sun zones, you can make informed decisions about panel placement and system sizing.
Your shade analysis directly impacts how many panels you can fit and how much power they’ll generate. Use this information when you’re ready to calculate your home’s energy needs and size your system accordingly.
Don’t skip this step. I’ve seen too many DIY systems underperform because someone guessed at their sun exposure. Take the time to do proper solar shade analysis upfront. Your future self will thank you when your panels actually generate the power you expected.