Your MPPT controller manual reads like stereo instructions from 1987. Twenty different controller settings, each with its own cryptic abbreviation and zero explanation of what happens if you get it wrong. I spent three weekends tweaking every setting on my first controller, convinced I was optimizing performance. Spoiler alert: most of those settings are digital decoration.
Here’s the truth nobody tells you upfront. Five controller settings actually affect your charging performance. The other fifteen exist to make the manual look impressive and give you new ways to accidentally break things.
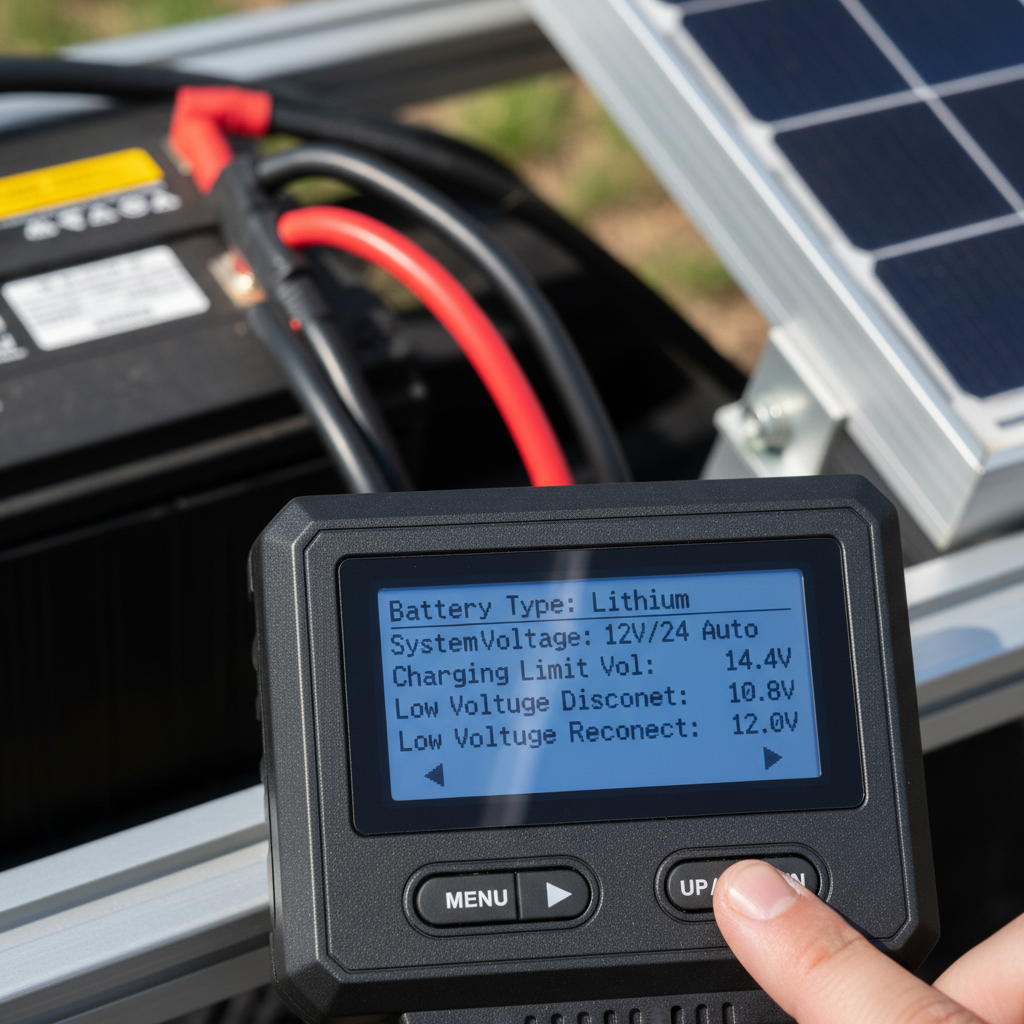
Battery Type: The Setting That Rules Them All
This is the big one. Get this wrong and your expensive lithium battery becomes an expensive paperweight.
Most controllers offer these options:
- Sealed/SLA – For sealed lead-acid batteries
- Gel – For gel batteries (obviously)
- Flooded – For flooded lead-acid with caps you can remove
- Lithium/LiFePO4 – For lithium iron phosphate batteries
- User Defined – For when you want to set custom voltages
The controller uses this setting to determine charging voltages at each stage. Pick the wrong battery type and you’re either undercharging (leaving capacity on the table) or overcharging (shortening battery life).
I learned this lesson with a gel battery that I mistakenly set to “flooded.” The controller pushed 14.8V into a battery that wanted 14.1V maximum. That battery lasted about as long as a snowball in Phoenix.
Pro tip: When in doubt, check your battery manual or the label on the battery itself. Don’t guess. Batteries are expensive enough without killing them prematurely.
Charging Voltage Parameters: Where Precision Matters
Most people skip right past the voltage settings because “the defaults should work, right?” Wrong. Dead wrong.
Here’s what each voltage stage actually does:
Bulk Voltage: Maximum charging voltage during the initial charging phase. Too low and charging takes forever. Too high and you’re cooking your batteries.
Absorption Voltage: The “maintenance” voltage that holds steady once bulk charging finishes. This is where most of the final capacity gets added.
Float Voltage: The trickle charge that keeps batteries topped off without overcharging them.
These voltages change based on your battery chemistry. A 12V lithium system might use 14.2V bulk, 14.2V absorption, and 13.6V float. Meanwhile, a flooded lead-acid system needs 14.8V bulk, 14.4V absorption, and 13.2V float.
The difference matters more than you think. I once ran lithium batteries with lead-acid voltage settings for a month. The batteries worked fine, but I was leaving about 20% capacity unused because the absorption voltage was too low.
Absorption Time: The Goldilocks Zone
Absorption time determines how long the controller holds at absorption voltage after bulk charging ends. Too short and batteries never reach full capacity. Too long and you’re wasting energy heating batteries unnecessarily.
Most controllers default to 2 hours absorption time. That works fine for lead-acid batteries that need time to fully absorb the charge. But lithium batteries? They’re done charging in minutes, not hours.
Here’s my rule of thumb:
- Lead-acid: 2-4 hours depending on battery size
- Lithium: 15-30 minutes maximum
You’ll know your absorption time is too long if you notice the controller switching to float, then back to absorption repeatedly. That’s the controller confused about whether charging is actually complete.
Temperature Compensation: The Setting Everyone Forgets
Battery voltage changes with temperature. Cold batteries need higher charging voltages. Hot batteries need lower voltages. Temperature compensation adjusts charging voltages automatically based on battery temperature.
Most controllers default to -30mV per degree Celsius. That works for lead-acid batteries. But lithium batteries? They barely need any temperature compensation at all.
Here’s where people mess up: they leave temperature compensation enabled on lithium systems. Then they wonder why their batteries won’t charge properly in winter.
The fix is simple. Turn off temperature compensation for lithium batteries. Leave it enabled for lead-acid.
But here’s the catch – you need a temperature sensor connected to actually use this feature. Many people enable temperature compensation without installing the sensor. The controller just guesses at battery temperature, usually incorrectly.
Equalization Settings: Handle With Extreme Care
Equalization is a controlled overcharge designed to balance individual cells in lead-acid batteries. It’s like CPR for sulfated batteries – potentially life-saving but dangerous if done wrong.
Most controllers let you set:
- Equalization voltage (usually 15.5-16V for 12V systems)
- Equalization duration (typically 1-2 hours)
- Equalization frequency (every 30-90 days)
Here’s the critical part: never equalize sealed batteries. That includes AGM, gel, and lithium batteries. Equalization is only for flooded lead-acid batteries with removable caps.
I watched a friend destroy a $400 AGM battery bank by accidentally triggering equalization. The batteries swelled up like balloons and never recovered.
If you have sealed batteries, disable automatic equalization completely. Most controllers let you turn off the automatic equalization timer.
What About All Those Other Settings?
The manual lists twenty settings, but we’ve only covered five. What about the rest?
Most are either diagnostic displays or safety features you shouldn’t touch:
- Load control settings: Only matter if you connect loads to the controller’s load terminals
- Low voltage disconnect: Safety feature that’s usually set correctly from the factory
- Maximum charging current: Should match your controller’s rating
- Display settings: Cosmetic preferences that don’t affect performance
The manufacturers include these settings because different markets have different requirements. Your basic RV setup doesn’t need half of them.
Focus on the five settings we covered. Get those right and your controller settings will optimize charging performance without the complexity.
Programming Your Controller: The Step-by-Step Reality
Every controller brand has different menus, but the process is similar:
1. Find the battery type setting first. Everything else depends on this choice.
2. Check the default voltages. Compare them to your battery manufacturer’s specifications.
3. Adjust absorption time based on your battery chemistry.
4. Configure temperature compensation (or turn it off for lithium).
5. Disable automatic equalization unless you have flooded batteries.
Don’t overthink it. These five controller settings handle 95% of charging optimization. The rest is just feature creep designed to make the controller seem more sophisticated than it needs to be.
After you make changes, test your system to verify everything works as expected. Better to catch configuration mistakes early than discover them when you’re dry camping without shore power.
Your controller will work better with five settings configured correctly than with twenty settings configured poorly. Sometimes less really is more.
1 thought on “MPPT Controller Settings: 5 That Actually Matter”