Let me guess. You’re looking at your DIY solar system plan, and someone mentioned you need a solar combiner box. Your first thought? “That’s just another expensive box I have to buy.”
I thought the same thing. Skipped it on my first build. Big mistake.
Here’s why that little box isn’t optional fluff – it’s the difference between a system that works safely for years and one that becomes a very expensive fire hazard.
What Is a Solar Combiner Box Anyway?
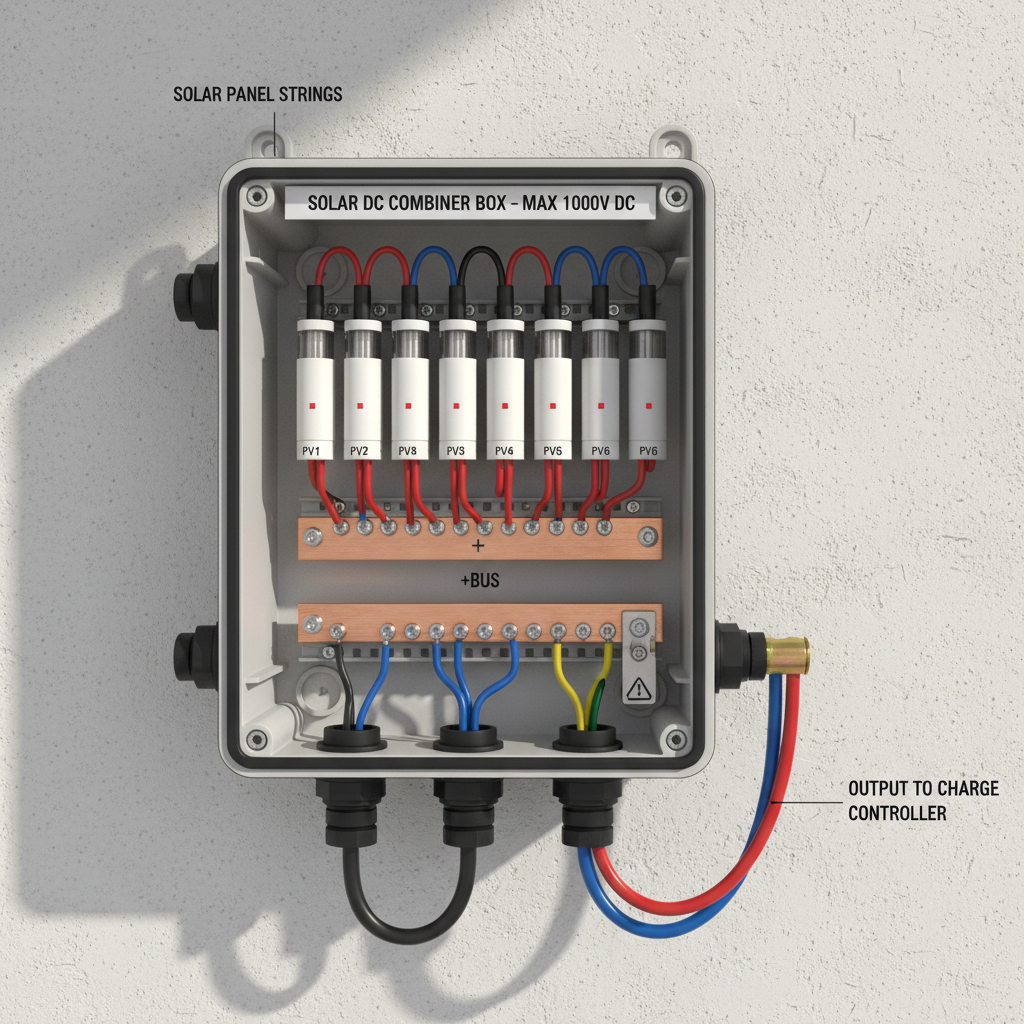
Think of a solar combiner box as the junction where all your solar panel strings meet before heading to your charge controller. Instead of running multiple wires directly to your controller, you combine them in one weatherproof enclosure.
It’s basically a protected meeting point with fuses or breakers for each string. Nothing fancy, but absolutely critical.
Most beginners skip it because it looks like extra work. I get it. You’re already overwhelmed with sizing your solar panels and figuring out wire gauges.
But here’s the thing – that “extra” box prevents about 90% of the problems that’ll make you hate your DIY solar system later.
Why Your Solar Combiner Box Prevents Expensive Disasters
When I skipped the combiner box on my first RV system, everything seemed fine. Until it wasn’t.
Here’s what happens when you don’t use one:
Problem 1: No Individual String Protection
One panel develops a short circuit. Without individual fuses, the fault current flows through all your other panels. Best case? Damaged panels. Worst case? Fire.
Problem 2: Troubleshooting Nightmares
Something stops working. Without a combiner box, you’re crawling around testing individual panels on the roof. With one, you check fuses in a convenient box at ground level.
Problem 3: Voltage Drop from Long Runs
Multiple long wire runs from panels to controller create voltage drop issues. A combiner box lets you use shorter runs to the box, then one heavy cable to the controller.
Trust me, replacing a blown fuse is way easier than replacing melted panels.
When You Actually Need a Solar Combiner Box
Not every system needs a combiner box. Here’s when you can skip it:
• Single panel systems
• Two panels wired in series to one controller
• Micro-inverter systems (they handle combining electronically)
You definitely need one when:
• Running 3+ strings of panels
• Panels are more than 50 feet from your charge controller
• You have mixed panel types or orientations
• Local code requires it (check your area)
If you followed my home energy needs calculation and ended up with a larger system, you probably need one.
Solar Combiner Box Components That Matter
A proper combiner box isn’t just an empty enclosure. Here’s what goes inside:
NEMA 3R or 4 Weatherproof Enclosure
Needs to handle outdoor conditions. Cheap plastic boxes crack in UV light. Don’t ask how I know.
Individual String Fuses or Breakers
Each panel string gets its own protection. Fuses are cheaper, breakers are more convenient for troubleshooting.
Bus Bars for Positive and Negative
Where all your strings connect before heading to the controller. Proper bus bars prevent loose connections.
DC Surge Protector (Optional but Smart)
Lightning doesn’t care about your budget. A surge protector can save your entire system.
Quality components cost more upfront but prevent expensive replacements later.
How to Wire Your Solar Combiner Box Without Creating a Fire Hazard
Here’s where most DIYers mess up. Wiring looks simple until you’re staring at a box full of terminals.
Step 1: Size Your Fuses Correctly
Each string fuse should be 125% of the panel’s short-circuit current (Isc). Check your panel specs. A 10A Isc panel needs a 15A fuse minimum.
Step 2: Use Proper Wire Gauges
From panels to combiner box, follow your wire gauge calculations. From combiner to controller, size for the combined current of all strings.
Step 3: Keep Positive and Negative Separated
Use separate bus bars. Keep them physically separated in the box. Arc faults happen when positive touches negative under load.
Step 4: Label Everything
Trust me on this. Label each string fuse. Future you will thank present you when troubleshooting at 5 AM.
Step 5: Test Before Closing
With panels covered, check continuity through each string. Uncover panels and verify voltage at the output terminals.
Take your time here. Rushed wiring kills systems and sometimes people.
Solar Combiner Box Installation Tips
Location matters more than you think.
Mount It in Shade
Electronics last longer when they’re not baking in direct sun. Find a shaded spot near your charge controller.
Keep It Accessible
You’ll need to check fuses eventually. Don’t mount it where you need a ladder and three yoga poses to reach.
Allow Ventilation
Even weatherproof boxes need air circulation. Don’t stuff it in a completely sealed space.
Ground the Enclosure
Metal enclosures need proper grounding. This isn’t optional for safety compliance.
If you’re working on an RV system, check out the RV solar grounding requirements – they’re different from home installations.
When to Skip the DIY Route
I’m all for DIY, but sometimes you need help.
Call a professional if:
• Local code requires professional installation
• You’re uncomfortable working with electrical systems
• Your system is over 48V (higher voltages are less forgiving)
• You can’t figure out proper fuse sizing
There’s no shame in getting help. A professional installation beats a dangerous DIY job every time.
Common Solar Combiner Box Mistakes
Learn from my mistakes (and others I’ve witnessed):
Using Automotive Fuses
They’re not rated for DC solar voltages. Use proper solar DC fuses or breakers.
Undersized Output Cable
The cable from combiner to controller carries all your combined current. Size it accordingly or watch it melt.
Mixing Fuse Types
Stick with one type of fuse holder. Mixing creates loose connections and hot spots.
Forgetting the Equipment Ground
All metal components need grounding. This includes the combiner box enclosure.
These mistakes turn a safety device into a safety hazard.
Final Thoughts on Solar Combiner Boxes
Yes, a solar combiner box adds cost and complexity to your DIY system. But it also adds safety, reliability, and code compliance.
Think of it as insurance for your solar investment. You hope you never need it, but you’ll be glad it’s there when things go wrong.
And trust me – in DIY solar, things eventually go wrong. The question is whether you’ll be prepared for it or scrambling to fix expensive damage.
Start planning your system right with proper component sizing and protection. Your future self will thank you when you’re enjoying reliable solar power instead of dealing with electrical fires.
Need to verify your completed system works correctly? Don’t forget to run proper load testing once everything’s connected.