When you’re setting up your first RV solar grounding system, safety should be your top priority. Proper grounding protects both your equipment and your family from electrical hazards that could turn a dream RV adventure into a nightmare.
Many DIY enthusiasts get excited about the panels, batteries, and inverters – but overlook this critical safety component. However, understanding RV solar grounding basics isn’t rocket science, and getting it right from the start will give you peace of mind for years to come.
Why RV Solar Grounding Matters More Than You Think
Unlike stationary home solar systems, RV installations face unique challenges. Your solar setup travels down highways, experiences vibrations, and encounters varying weather conditions. This constant movement makes proper grounding even more critical.
Grounding serves two essential purposes in your mobile solar setup. First, it provides a safe path for electrical faults, preventing dangerous voltage buildup on metal components. Second, it protects your expensive equipment from lightning strikes and electrical surges.
Without proper RV solar grounding, you risk equipment damage, fire hazards, and even electrocution. The good news? Following basic grounding principles keeps these risks at bay.
Essential Equipment for RV Solar Grounding Systems
Before diving into installation, let’s gather the right tools and materials. You’ll need copper grounding conductors (typically 10 AWG minimum), grounding lugs, and corrosion-resistant hardware.
Your equipment list should include a digital multimeter for testing connections, wire strippers, and a drill with appropriate bits. Don’t forget anti-corrosion compound – it’s crucial for maintaining solid connections in mobile environments.
Most importantly, you’ll need grounding electrode conductors and proper bonding materials. These create the electrical pathways that make your system safe and code-compliant.
Choosing the Right Wire Gauge
Wire sizing for grounding depends on your system’s amperage capacity. For most RV solar setups, 10 AWG copper wire handles grounding duties effectively. However, larger systems may require 8 AWG or even 6 AWG conductors.
Remember, thicker isn’t always better – but undersized grounding conductors create safety hazards. When in doubt, consult the National Electrical Code (NEC) requirements for your specific installation size.
Step-by-Step RV Solar Grounding Installation
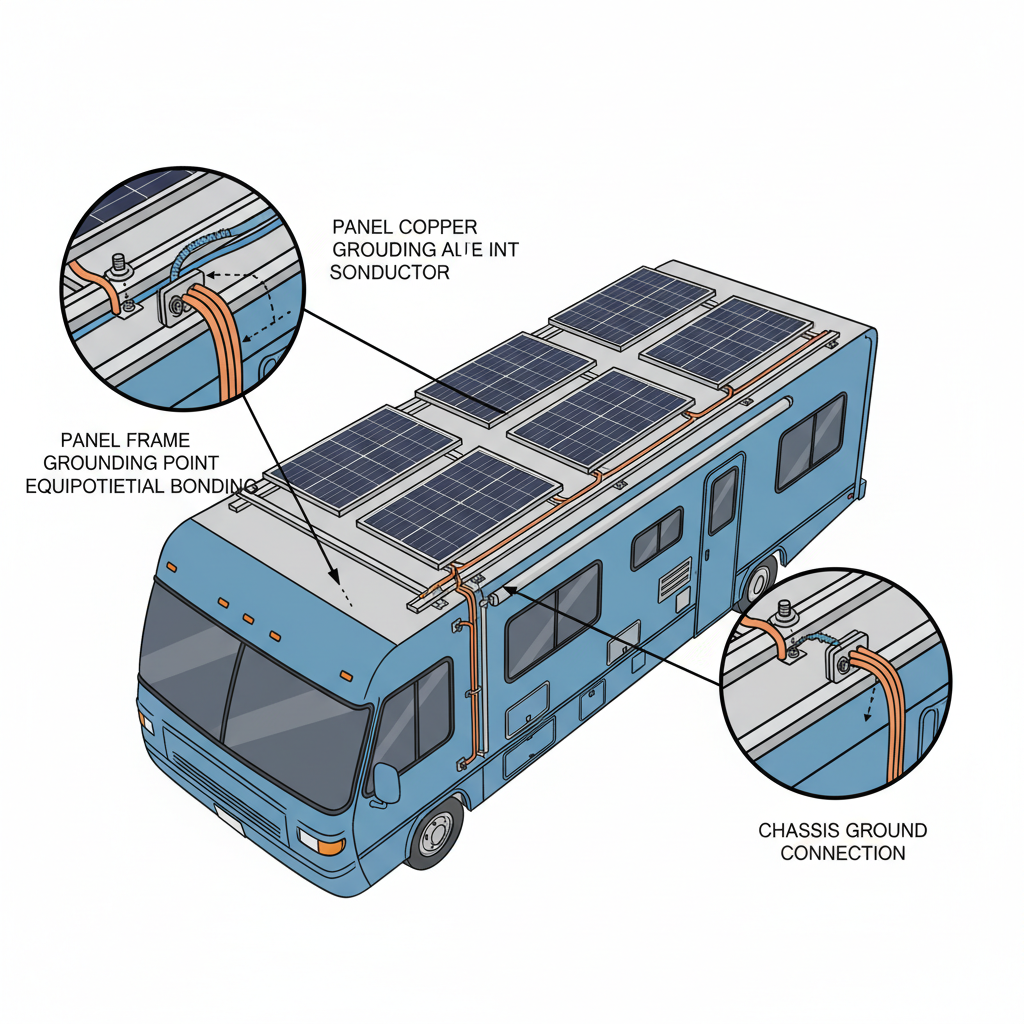
Start by identifying all metal components in your solar system. This includes panel frames, mounting hardware, charge controller cases, and inverter enclosures. Each metallic part needs proper grounding connection.
Begin with your solar panels mounted on the roof. Connect grounding conductors to designated grounding holes on each panel frame. Many panels have pre-drilled holes specifically for this purpose.
Next, bond all mounting rails together using continuous grounding conductors. This creates an equipotential bonding system that prevents voltage differences between components.
Run your main grounding conductor from the solar array down to your RV’s chassis ground point. This connection ties your solar system into the RV’s existing grounding network.
Connecting to Your RV’s Chassis Ground
Locate your RV’s main chassis grounding point – usually near the electrical panel or converter. Clean this connection point thoroughly, removing any paint, rust, or corrosion that could interfere with conductivity.
Attach your solar system’s grounding conductor using appropriate hardware. Stainless steel bolts and star washers ensure reliable, long-lasting connections that won’t loosen during travel.
Apply anti-corrosion compound to all connections before final tightening. This simple step prevents galvanic corrosion that could compromise your grounding system over time.
Testing Your RV Solar Grounding System
Once installation is complete, testing ensures everything works correctly. Use your multimeter to verify continuity between all grounded components and the chassis ground point.
Check resistance measurements between different parts of your system. Readings should be very low (typically less than 1 ohm) indicating solid electrical connections throughout your RV solar grounding network.
Also test from each grounded component to a known good ground point. High resistance readings suggest connection problems that need immediate attention.
Common Testing Mistakes to Avoid
Don’t test grounding with system power on – this creates safety hazards and inaccurate readings. Always disconnect battery power before conducting resistance tests.
Similarly, avoid testing during wet conditions when moisture might affect readings. Choose dry weather for accurate measurements and safer working conditions.
Maintenance Tips for Long-Term Safety
Regular maintenance keeps your grounding system functioning properly. Inspect all connections at least twice yearly, looking for signs of corrosion, loosening, or damage.
Pay special attention to connections that experience vibration during travel. These joints need periodic retightening to maintain proper conductivity and safety.
Before each camping season, test your grounding system’s integrity using the same procedures from initial installation. This proactive approach catches problems before they become dangerous.
Consider keeping spare grounding materials in your RV toolkit. Common wiring mistakes often involve grounding shortcuts, so having proper materials encourages correct repairs.
Integration with Your Complete Solar Setup
Grounding works hand-in-hand with other system components you’ve carefully sized and selected. If you’ve followed our solar panel sizing guide, your grounding requirements scale accordingly.
Larger systems need more robust grounding networks, while smaller setups can use simpler configurations. The key is matching your grounding approach to your overall system design and power requirements.
Remember that proper RV solar grounding complements other maintenance tasks like battery maintenance and regular system inspections. Together, these practices ensure reliable, safe operation.
When to Call a Professional
While DIY grounding is achievable for most RV owners, some situations require professional expertise. Complex installations with multiple inverters or unusual mounting configurations benefit from expert guidance.
Additionally, if you’re uncomfortable working with electrical systems or lack proper testing equipment, hiring a certified electrician ensures code compliance and safety.
Don’t risk your family’s safety trying to save a few dollars on critical electrical work. Professional installation provides peace of mind and often includes warranties on workmanship.
Proper RV solar grounding forms the foundation of any safe mobile solar installation. By following these guidelines and maintaining your system regularly, you’ll enjoy years of reliable, hazard-free solar power on all your adventures.