When you’re setting up your DIY solar system, solar grounding isn’t just a code requirement – it’s your first line of defense against electrical hazards. Whether you’re installing panels on your home’s roof or building a portable system for your RV, proper grounding protects both you and your expensive solar equipment from dangerous electrical surges and faults.
In this comprehensive guide, we’ll walk through everything you need to know about solar grounding. From understanding basic electrical concepts to meeting code requirements, you’ll learn how to ground your system safely and correctly.
What Is Solar Grounding and Why Does It Matter?
Solar grounding creates a safe path for electrical current to flow into the earth during fault conditions. Think of it as an emergency exit for electricity when something goes wrong in your system.
There are two main types of grounding in solar installations:
Equipment grounding connects metal components like panel frames, mounting rails, and inverter cases to ground. This prevents these parts from becoming energized during a fault.
System grounding connects one conductor of your DC electrical system to ground. This stabilizes voltage and provides overcurrent protection.
Without proper grounding, a simple wiring fault could turn your solar panels or mounting equipment into a deadly electrical hazard. Additionally, lightning strikes or power surges could destroy thousands of dollars worth of equipment in seconds.
When Solar Grounding Is Required by Code
The National Electrical Code (NEC) has specific requirements for solar system grounding. Understanding these rules helps ensure your installation is both safe and legal.
For most residential solar installations over 50 volts, both equipment and system grounding are mandatory. This includes virtually all grid-tie systems and larger off-grid installations.
However, there are some exceptions. Small systems under 50 volts DC may only require equipment grounding. Some portable RV systems might fall into this category, depending on your configuration.
Before starting any installation, check with your local building department. They may have additional requirements beyond the NEC. Some areas also require permits and inspections for solar installations.
Remember, even if code doesn’t require grounding for your specific system, it’s still a smart safety practice. The small investment in grounding equipment could save your life or prevent expensive equipment damage.
Essential Grounding Components You’ll Need
Proper solar grounding requires several key components. Let’s break down what you’ll need for a typical installation.
Grounding conductors are the copper wires that carry fault current safely to ground. For most residential solar systems, you’ll need #10 AWG bare copper wire minimum, though larger systems may require #8 or #6 AWG.
Grounding electrode conductors connect your system to the actual ground. These are typically #6 AWG copper wire and must be sized according to your system’s electrical rating.
Equipment grounding lugs attach grounding conductors to solar panel frames and mounting rails. Look for UL-listed lugs specifically designed for solar applications.
Grounding electrode provides the actual connection to earth. This might be a driven ground rod, concrete-encased electrode, or connection to your home’s existing grounding system.
You’ll also need various connectors, clamps, and hardware to make secure connections. Always use components rated for outdoor use and compatible with your specific equipment.
Step-by-Step Home Solar Grounding Process
Grounding a residential solar system involves connecting both the equipment and the electrical system to your home’s grounding network. Here’s how to do it safely.
Start by identifying your home’s main grounding electrode system. This is usually a ground rod driven near your electrical panel or a concrete-encased electrode in your foundation.
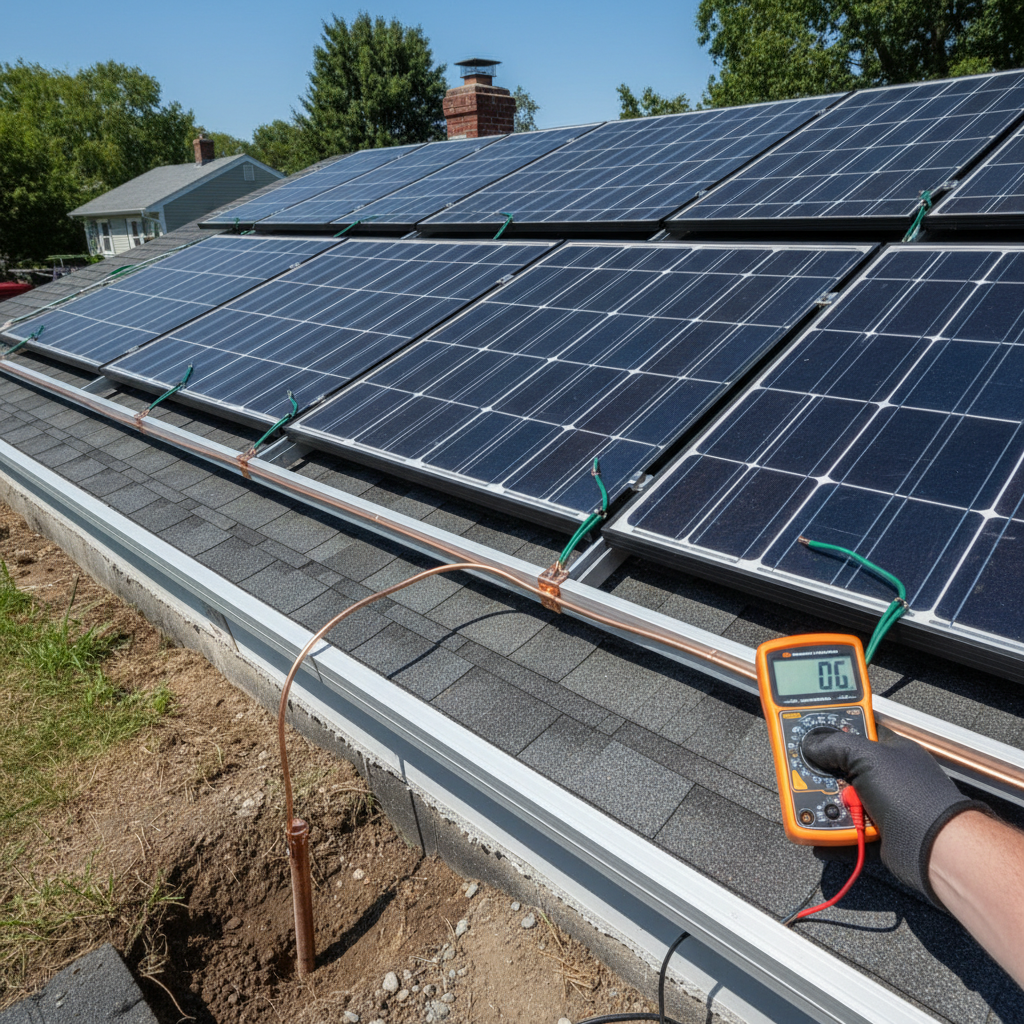
Next, install equipment grounding for your solar panels. Connect a grounding conductor to each panel frame using appropriate lugs. Run this conductor along your mounting rails, connecting each rail section.
For the array grounding, bring all equipment grounding conductors together at a single point near your inverter. This becomes your “grounding electrode conductor” connection point.
Connect your grounding electrode conductor from this point to your home’s grounding electrode system. Make sure this connection is secure and protected from corrosion.
Finally, ensure your inverter is properly grounded according to manufacturer specifications. Most string inverters have dedicated grounding terminals for both equipment and system grounding.
If you’ve already completed your solar panel sizing calculations, you’ll know your system voltage and can size grounding conductors appropriately.
RV Solar Grounding: Special Considerations
RV solar installations have unique grounding challenges compared to residential systems. The mobile nature of RVs and their metal construction require special attention to grounding practices.
Many RV solar systems operate at lower voltages, which may reduce code requirements. However, equipment grounding is still essential for safety. Connect all metal components including panel frames, mounting hardware, and charge controller cases.
For equipment grounding in RVs, connect to the RV’s existing grounding system through the DC negative bus bar or chassis ground. Consult your RV’s electrical diagram to identify the proper connection point.
One advantage of RV installations is that the metal chassis often provides excellent grounding. However, ensure connections are clean and secure, as road vibration can loosen hardware over time.
Consider the challenges of different campgrounds and locations. Unlike home installations with permanent ground rods, your RV grounding system must work everywhere you travel.
If you’re upgrading from PWM to MPPT controllers, our guide on MPPT vs PWM charge controllers covers grounding considerations for both types.
Common Grounding Mistakes to Avoid
Even experienced DIYers make grounding mistakes that can compromise safety and code compliance. Here are the most common errors to watch for.
Using inadequate wire sizes is a frequent problem. Grounding conductors must be sized according to code requirements, not just what “looks right.” Undersized conductors can’t safely carry fault currents.
Poor connections cause many grounding failures. Loose, corroded, or improperly made connections create high resistance paths that won’t function during faults. Always use proper lugs, clamps, and anti-corrosion compounds.
Mixing different metals can cause galvanic corrosion over time. Stick with copper conductors and compatible hardware throughout your grounding system.
Forgetting to ground all equipment is another common oversight. Every metal component that could become energized needs grounding protection. This includes mounting rails, panel frames, combiner boxes, and enclosures.
Improper routing of grounding conductors can create safety hazards. Keep grounding wires away from sharp edges and protect them from physical damage. Secure conductors properly to prevent movement.
Similar to our article on common solar wiring mistakes, grounding errors are often easy to prevent with careful planning and attention to detail.
Tools and Materials for Safe Installation
Having the right tools makes solar grounding installation much easier and safer. Here’s what you’ll need for a professional-quality job.
A good multimeter is essential for testing continuity and resistance in your grounding system. This helps verify connections are properly made and will function when needed.
Wire strippers and crimping tools sized for your grounding conductors ensure secure connections. Don’t try to make do with household tools – invest in proper electrical equipment.
A torque wrench helps achieve proper connection tightness without over-tightening and damaging components. Many grounding lugs have specific torque requirements.
For materials, always buy more grounding conductor than you think you need. It’s better to have extra wire than come up short during installation.
Anti-corrosion compounds protect connections from weather and galvanic corrosion. This is especially important for outdoor installations exposed to moisture.
Don’t forget basic safety equipment like insulated gloves and safety glasses. Even though you’re working with DC systems, grounding involves working around electrical equipment.
Testing Your Grounding System
After installation, testing verifies your grounding system will work when needed. This step is crucial for both safety and code compliance.
Use a multimeter to check continuity between all grounded components. You should see near-zero resistance between panel frames, mounting rails, and the grounding electrode.
Test the resistance to ground from your main grounding point. Most residential systems should show less than 25 ohms resistance to ground, though local codes may have different requirements.
Verify all connections are tight and properly made. Loose connections will show higher resistance readings and may fail during fault conditions.
Consider having a qualified electrician perform final testing and inspection. This is especially important for grid-tie systems that must pass utility interconnection requirements.
Document your test results for future reference. This information is valuable for troubleshooting and may be required for permits or insurance.
Maintenance and Long-Term Care
Like other aspects of solar system maintenance, grounding requires periodic attention to ensure continued safety and effectiveness.
Inspect grounding connections annually, looking for signs of corrosion, looseness, or damage. Pay special attention to connections exposed to weather.
Test system grounding resistance every few years or after significant weather events. Lightning strikes or ground shifts can affect grounding system performance.
Keep vegetation away from ground rods and grounding conductors. Plant roots and lawn equipment can damage grounding components over time.
For RV systems, check grounding connections more frequently due to road vibration and varying environmental conditions.
Our guide on battery maintenance includes additional safety tips that complement proper system grounding.
When to Call a Professional
While many aspects of solar grounding are DIY-friendly, some situations require professional expertise. Knowing when to call for help keeps you safe and ensures code compliance.
Complex grid-tie installations often require professional design and installation. Utility interconnection requirements can be complicated, and mistakes can be expensive.
If your local code requires permits and inspections, consider hiring a licensed electrician familiar with solar installations. They can navigate the permitting process and ensure code compliance.
When in doubt about any aspect of grounding, consult with professionals. The cost of expert advice is minimal compared to the potential consequences of improper grounding.
For basic system troubleshooting and maintenance, however, most DIY enthusiasts can handle grounding tasks safely with proper knowledge and tools.