Let me guess — you’ve calculated your solar panel sizing perfectly, bought all the right components, and your system still isn’t performing like it should. Welcome to the world of voltage drop, the silent killer of solar systems that nobody talks about until it’s too late.
Here’s what I learned the hard way: voltage drop isn’t some engineering mystery. It’s simple physics that’ll cost you real money if you ignore it. Every foot of wire between your panels and battery is stealing power from you. The question is how much you’re willing to lose.
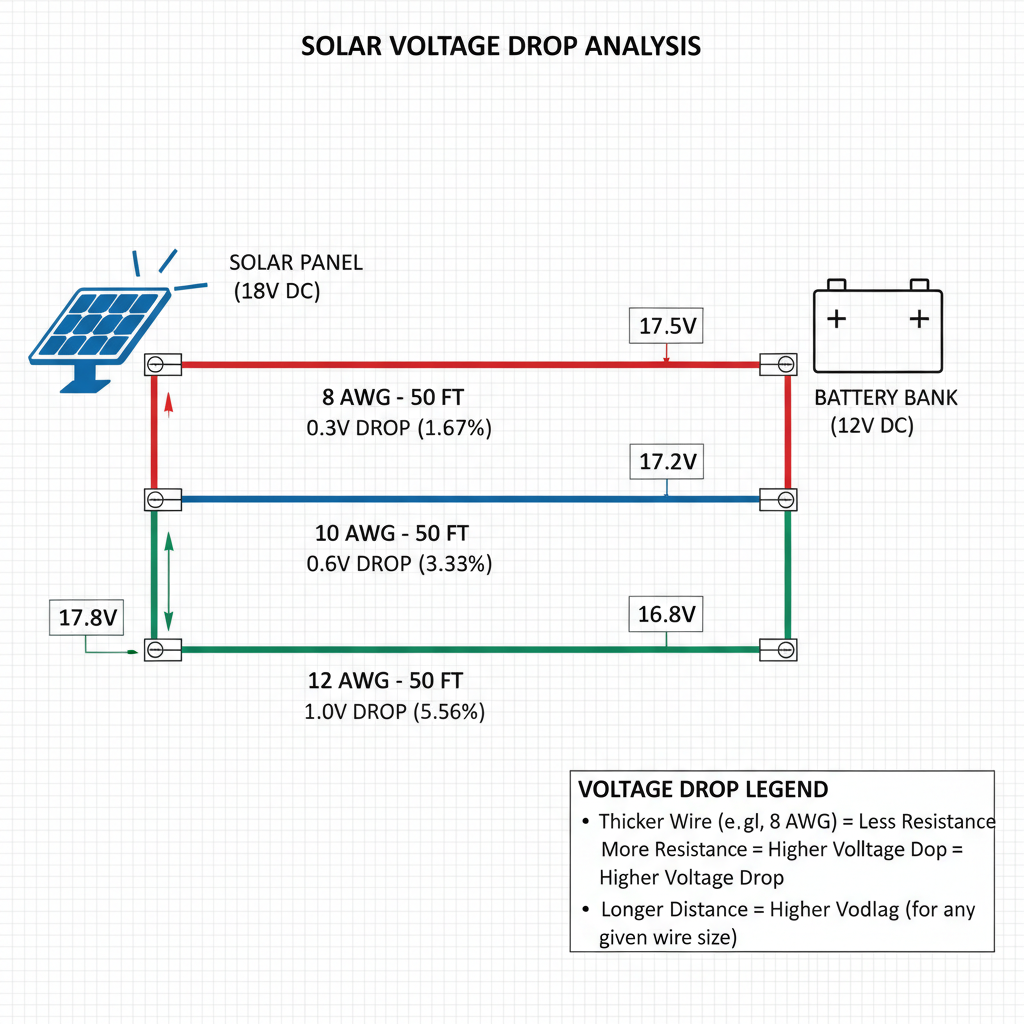
What Is Solar Voltage Drop (And Why It Matters)
Voltage drop is exactly what it sounds like — your voltage literally drops as electricity travels through wire. Think of it like water flowing through a garden hose. The longer the hose, the less pressure you get at the end.
In solar systems, this matters because lower voltage means less power reaching your batteries. And less power means you’re not getting what you paid for.
Most electrical codes require voltage drop to stay under 3% for safety circuits. But here’s the thing — even 2% voltage drop means you’re losing 2% of your power. Forever. That adds up fast when you’re trying to keep your batteries charged.
The Real Cost of Ignoring Voltage Drop
I once helped a neighbor troubleshoot his RV solar setup. He couldn’t figure out why his 400-watt panel array was only putting out 320 watts on a perfect sunny day. Turns out, he was using 12 AWG wire for a 40-foot run from his roof to his battery compartment.
That 20% power loss was costing him about $80 worth of electricity per year. The fix? Upgrade to 8 AWG wire for $30. Math that actually works in your favor.
Solar Voltage Drop Formula (The Simple Version)
Don’t worry — you don’t need an engineering degree for this. The voltage drop formula looks scarier than it is:
Voltage Drop = (2 × K × I × L) ÷ A
Where:
- K = Wire material constant (12.9 for copper)
- I = Current in amps
- L = One-way distance in feet
- A = Wire cross-sectional area in circular mils
But here’s the thing — circular mils are ridiculous units that nobody uses in real life. So let’s make this actually useful.
The Wire Gauge Chart Method (Much Easier)
Instead of doing math every time, smart people use voltage drop tables. Here’s what voltage drop looks like for common wire runs:
12V System, 10 Amp Load:
- 14 AWG: 3.1% drop at 50 feet
- 12 AWG: 2.0% drop at 50 feet
- 10 AWG: 1.2% drop at 50 feet
- 8 AWG: 0.8% drop at 50 feet
See the pattern? Bigger wire (smaller AWG number) means less voltage drop. But bigger wire costs more. Welcome to engineering trade-offs.
Calculate Voltage Drop for Your Solar System
Let’s walk through a real example. Say you’re installing a 400-watt solar panel 30 feet from your battery bank. Here’s how to figure out what wire you need.
First, calculate your current: 400 watts ÷ 12 volts = 33.3 amps
Now check the voltage drop for different wire sizes at 30 feet:
- 10 AWG: 4.2% voltage drop (too high)
- 8 AWG: 2.6% voltage drop (acceptable)
- 6 AWG: 1.7% voltage drop (better)
- 4 AWG: 1.0% voltage drop (excellent)
Most people would choose 8 AWG here. It meets the 3% rule and doesn’t break the bank. But if you’re running a tight energy budget, that extra 1.6% you’d save with 6 AWG might be worth the cost.
Real-World Voltage Drop Examples
Here are some scenarios I see all the time:
RV Roof Mount: 400W panel, 25-foot run to batteries
– Current: 33.3 amps at 12V
– Recommended wire: 8 AWG (2.2% drop)
– Never use: 12 AWG (5.5% drop)
Shed to House Run: 800W array, 100-foot run
– Current: 66.7 amps at 12V
– Recommended wire: 2/0 AWG (2.8% drop)
– This is why people use 24V or 48V systems
Notice how that second example gets expensive fast? This is exactly why proper wire sizing matters so much for longer runs.
Wire Distance and Solar System Performance
Distance kills solar efficiency. Every extra foot of wire costs you power, and the relationship isn’t linear. Double your distance, and you quadruple your voltage drop (if you keep the same wire size).
This is why I always tell people to plan their component layout before buying wire. That battery bank location you picked might look clean, but is it costing you 10% of your power?
When to Use Higher System Voltages
Here’s a secret that’ll save you hundreds: higher voltage systems have lower current for the same power. Lower current means less voltage drop with the same wire.
A 400W load at different voltages:
- 12V system: 33.3 amps
- 24V system: 16.7 amps
- 48V system: 8.3 amps
Same power, way less current. This is why larger solar installations almost always use 24V or 48V systems. The wire savings alone often pay for the higher-voltage components.
Choosing the Right Wire Gauge for Solar
Here’s my wire selection process, refined through years of mistakes:
Step 1: Calculate your maximum current
Step 2: Measure your actual wire run distance
Step 3: Check voltage drop at that distance
Step 4: Compare wire costs vs. power loss
For most residential solar runs under 50 feet, 10 AWG handles up to 20 amps with acceptable voltage drop. But always do the math for your specific situation.
Common Wire Gauge Mistakes
The biggest mistake? Using household electrical wire for DC solar applications. AC and DC have different requirements, and using 14 AWG house wire for a 30-amp solar charge controller is asking for trouble.
Another classic: forgetting about temperature ratings. That cheap wire might work fine in your cool basement but fail miserably on a hot RV roof.
Solar Voltage Drop Calculator Tools
While you can absolutely do this math by hand, why make your life harder? Several online calculators make this process painless:
- Southwire voltage drop calculator
- Electrical engineering calculators
- Solar-specific wire sizing tools
Most of these tools let you input your system specs and get instant wire recommendations. Just remember to double-check their math — I’ve seen calculators give wildly different answers for the same inputs.
Building Your Own Voltage Drop Spreadsheet
If you’re planning multiple systems or like having control over the calculations, build a simple spreadsheet. Include columns for wire gauge, distance, current, and calculated voltage drop. Once you set up the formulas, you can experiment with different scenarios instantly.
Optimizing Long Wire Runs
Sometimes you can’t avoid long wire runs. Maybe your panels need to be 150 feet from your battery bank, or you’re connecting a remote shed to your main system. Here’s how to minimize the pain:
Option 1: Use massive wire. Expensive but effective.
Option 2: Switch to higher system voltage. Often cheaper than Option 1.
Option 3: Install a charge controller closer to the panels, then run lower-current wiring to the batteries.
I’ve used all three approaches, and Option 2 usually wins on cost. The jump from 12V to 24V systems often pays for itself in wire savings alone.
When Voltage Drop Actually Helps
Here’s something most guides won’t tell you: sometimes voltage drop works in your favor. If you’re using an MPPT charge controller, slight voltage drop on the panel side can actually improve efficiency by keeping the panels closer to their maximum power point.
But this is advanced optimization stuff. For beginners, just focus on keeping voltage drop under 3% and you’ll be fine.
The bottom line? Voltage drop is real, it costs money, and it’s completely preventable with proper planning. Do the math upfront, buy the right wire once, and stop losing power to physics.