Remember when I confidently ran 50 feet of 12 AWG wire from my solar panels to my battery bank, then wondered why my system performed like a lazy teenager on Sunday morning? Yeah, that was my introduction to voltage drop in solar systems. Spoiler alert: distance kills power, and I learned it the expensive way.
Voltage drop is the silent killer of DIY solar systems. It’s not dramatic like a blown fuse or obvious like a cracked panel. It just quietly steals your power, leaving you scratching your head wondering why your perfectly sized system isn’t delivering the goods.
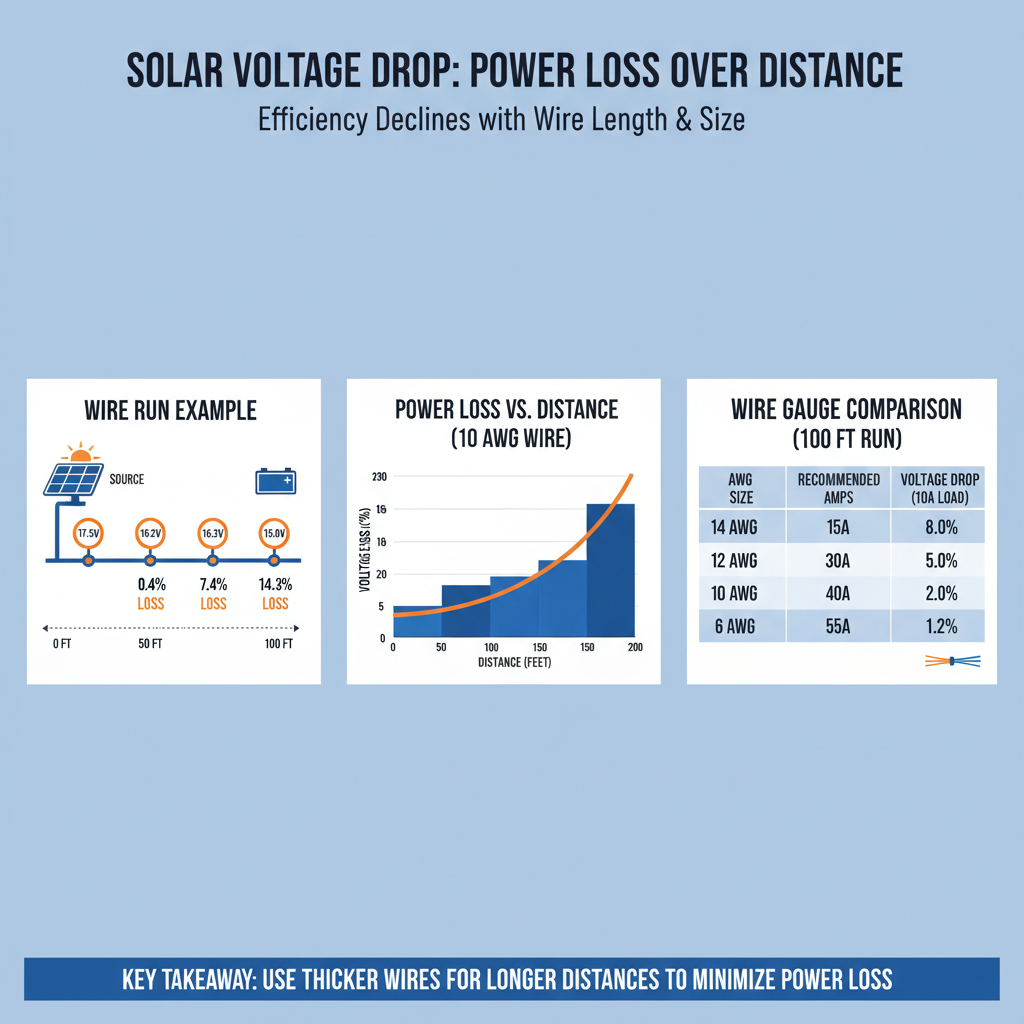
What Is Voltage Drop in Solar Systems?
Think of voltage drop like trying to drink a milkshake through a really long, skinny straw. The milkshake (your power) starts strong at the source, but by the time it reaches your mouth (your batteries), it’s barely trickling.
In electrical terms, voltage drop is the reduction in voltage that occurs when current flows through wire resistance. Every foot of wire steals a little bit of your precious solar power. The longer the run and the smaller the wire, the more power gets lost as heat.
Here’s the kicker: a 3% voltage drop means you’re losing 3% of your power. On a 400-watt system, that’s 12 watts just vanishing into thin air. Might not sound like much, but it adds up faster than credit card interest.
Why Voltage Drop Matters More in Solar
Solar systems are particularly sensitive to voltage drop because we’re often dealing with lower voltages and longer wire runs. When you’re running DC power from rooftop panels to a battery bank, every volt counts.
Plus, most charge controllers have minimum voltage requirements. If voltage drop pushes you below that threshold, your controller might not recognize that power is available. It’s like showing up to a party after it’s already over.
The Simple Voltage Drop Formula
Before you panic and reach for your calculator (or phone calculator, let’s be honest), the voltage drop formula isn’t rocket science. Though it might look intimidating at first glance.
Voltage Drop = (2 × Wire Length × Current × Wire Resistance) ÷ 1000
Let me break this down:
- 2: Because current goes out AND comes back (positive and negative wires)
- Wire Length: One-way distance in feet
- Current: Amps flowing through the wire
- Wire Resistance: Ohms per 1000 feet (from wire charts)
Still with me? Good. Now let’s make this practical with real examples.
Real-World Voltage Drop Example
Let’s say you’re running a 30-amp charge controller 25 feet from your solar panels using 10 AWG wire. Here’s how the math works:
- Wire length: 25 feet
- Current: 30 amps
- 10 AWG resistance: 0.999 ohms per 1000 feet
Voltage Drop = (2 × 25 × 30 × 0.999) ÷ 1000 = 1.5 volts
On a 12V system, that’s a 12.5% loss. Ouch. Time to upgrade that wire gauge or shorten the run.
Wire Gauge Charts That Actually Help
Here’s where most guides dump a massive, confusing chart on you. I’m going to give you the practical stuff you actually need.
For 12V Systems (3% voltage drop maximum):
- 10 feet: 14 AWG up to 15 amps, 12 AWG up to 20 amps
- 25 feet: 12 AWG up to 15 amps, 10 AWG up to 20 amps
- 50 feet: 10 AWG up to 15 amps, 8 AWG up to 20 amps
- 100 feet: 8 AWG up to 15 amps, 6 AWG up to 20 amps
For 24V Systems (same 3% target):
- 25 feet: 14 AWG up to 15 amps, 12 AWG up to 20 amps
- 50 feet: 12 AWG up to 15 amps, 10 AWG up to 20 amps
- 100 feet: 10 AWG up to 15 amps, 8 AWG up to 20 amps
Notice how 24V systems can use smaller wire for the same distance? That’s the magic of higher voltage systems. More on that in a minute.
When to Use Bigger Wire
Sometimes you need to go bigger than the charts suggest. If you’re planning system expansions, dealing with temperature extremes, or just want some safety margin, bump up one wire size.
I learned this lesson when I added more panels to my RV system. Suddenly my 12 AWG wire was borderline inadequate. Should’ve planned ahead with 10 AWG from the start.
How Distance Affects Solar Voltage Drop
Distance is the villain in our voltage drop story. Double the distance, double the voltage drop. It’s that simple and that brutal.
This is why proper solar panel sizing includes considering your wire runs from the beginning. You can’t just slap panels on your roof and hope for the best.
Strategic Wire Run Planning
Smart DIYers plan their wire routes like military strategists:
- Shortest path wins: Every unnecessary foot costs you power
- Centralize components: Keep charge controllers close to batteries
- Consider 24V systems: Higher voltage means lower current for the same power
For RV systems, this often means mounting your charge controller inside near your battery bank, not up by the panels. Yeah, it’s more convenient to mount everything on the roof, but convenience costs watts.
Calculating Your Acceptable Voltage Drop
The industry standard is 3% maximum voltage drop, but let’s talk about what that actually means for your system performance.
Voltage Drop Percentage = (Voltage Drop ÷ System Voltage) × 100
On a 12V system:
- 1% drop = 0.12 volts
- 3% drop = 0.36 volts
- 5% drop = 0.6 volts (getting problematic)
Here’s the thing: 3% is a conservative target. You can probably live with 5% in some situations, but why give up free power if you don’t have to?
When Voltage Drop Gets Expensive
High voltage drop doesn’t just waste power – it can actually damage your system. Charge controllers and inverters expect certain voltage ranges. Fall below those ranges, and equipment starts shutting down or operating inefficiently.
I’ve seen systems where voltage drop prevented batteries from fully charging. The owner kept blaming his battery chemistry choice, when the real problem was 50 feet of undersized wire.
Tools and Apps for Wire Run Calculations
While you can certainly do the math by hand (and should understand how), there are tools that make life easier:
Free Online Calculators:
- Blue Sea Systems voltage drop calculator
- Southwire voltage drop calculator
- Various solar-specific calculators
Mobile Apps:
- Electrical Calculator apps
- Solar design apps with built-in calculators
But honestly? Learn the basic formula first. Apps are great for checking your work, terrible for understanding what’s actually happening in your system.
The Reality Check Method
Here’s my favorite quick-and-dirty method: If your wire run requires more expensive wire than the cost difference of moving components closer together, move the components.
Sometimes it’s cheaper to relocate your charge controller than to upgrade 75 feet of wire from 10 AWG to 6 AWG. Do the math on both options.
Common Voltage Drop Mistakes
Let me save you from the mistakes I made (and watched others make):
Mistake #1: Ignoring temperature
Wire resistance increases with temperature. Hot attic runs or desert installations need bigger wire than the basic charts suggest.
Mistake #2: Forgetting about expansions
That 15-amp wire run looks perfect until you add more panels and suddenly need 25 amps. Plan ahead.
Mistake #3: Mixing up one-way vs round-trip distance
The formula uses one-way distance, but accounts for both wires. Don’t double-count.
Mistake #4: Using household electrical standards
Your house wiring follows different rules than solar DC wiring. Don’t assume 12 AWG is always fine for 20 amps.
The “Good Enough” Trap
I get it. Wire is expensive, and 4% voltage drop doesn’t sound much worse than 3%. But here’s the thing: solar systems last 25+ years. That extra 1% adds up to hundreds of dollars in lost power over the system lifetime.
Plus, undersized wire runs hot. Hot wire degrades faster, creates fire hazards, and makes connections fail sooner. It’s not just about efficiency – it’s about safety and longevity.
Troubleshooting High Voltage Drop
Think you might have voltage drop issues? Here’s how to diagnose and fix them:
Symptoms of excessive voltage drop:
- Batteries never reach full charge
- System performance worse than expected
- Charge controller shows lower input voltage than panel specs
- Wire runs feel warm to the touch
Testing voltage drop:
- Measure voltage at the source (panel or charge controller output)
- Measure voltage at the destination (charge controller input or battery)
- The difference is your voltage drop
If you’re seeing more than 3-5% drop, you need bigger wire or shorter runs. No amount of solar troubleshooting will fix an undersized wire problem.
Quick Fixes vs Long-Term Solutions
Short-term: You can sometimes reduce current by connecting panels in series instead of parallel, raising system voltage. This reduces current for the same power.
Long-term: Replace undersized wire with proper gauge cable. Yes, it’s expensive and annoying, but it’s the only real fix.
Don’t try to band-aid a wire sizing problem with multiple parallel runs of smaller wire. It’s code-questionable and creates more connection points to fail.
Solar voltage drop isn’t sexy, but it’s crucial for system performance. Take the time to calculate your wire runs properly, and your future self will thank you every time you see those fully charged batteries.
Remember: measure twice, buy wire once. And when in doubt, go one size bigger. Your system will run cooler, last longer, and deliver the power you paid for.