I learned about solar array wiring the hard way when my first DIY system produced about as much power as a desk lamp. Turns out, connecting panels wrong is like building a chain with one weak link – everything fails. Here’s what I wish someone had told me before I fried my first charge controller.
Understanding series versus parallel wiring isn’t rocket science. But getting it wrong will make your solar panels perform like they’re covered in mud. Let me walk you through both methods so you can wire your array correctly the first time.
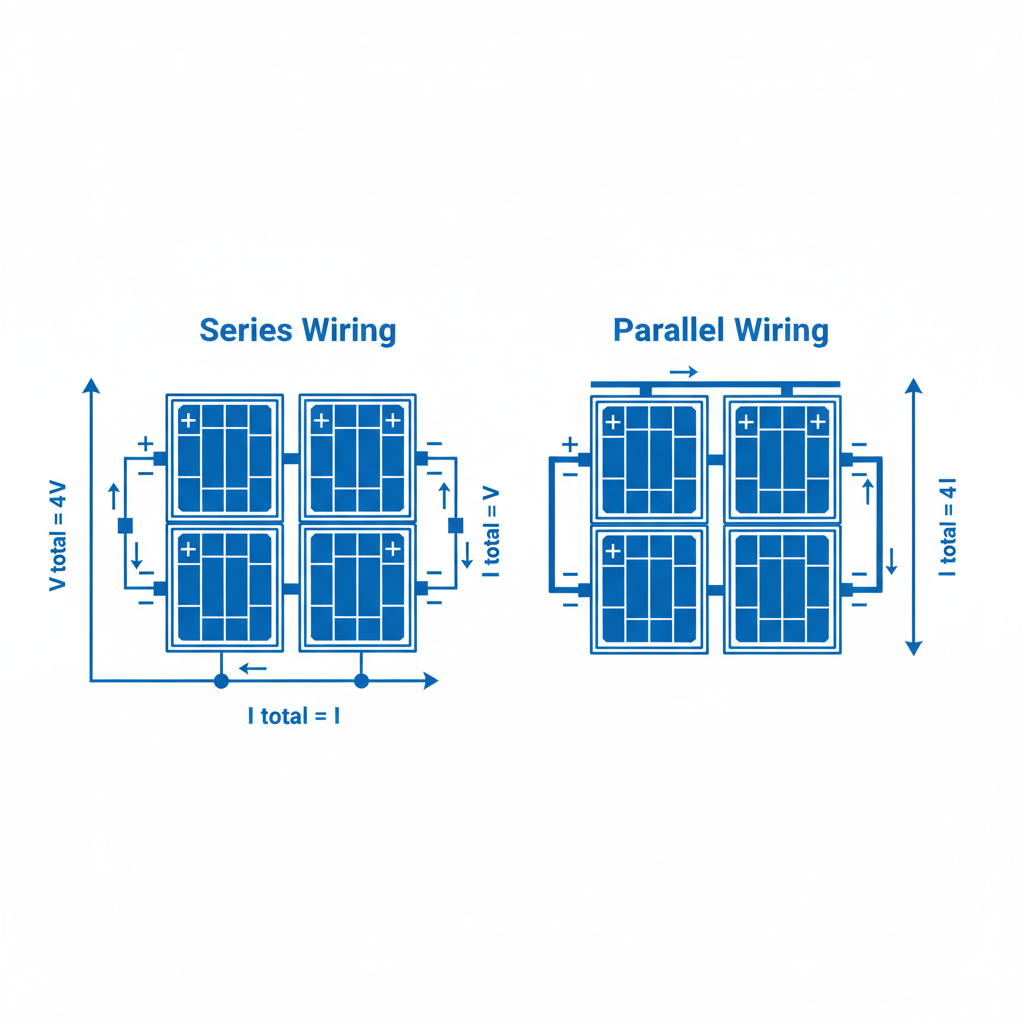
Series Wiring: The Voltage Highway
Series wiring connects your panels end-to-end, like Christmas lights. The positive terminal of one panel connects to the negative terminal of the next panel. This creates a single path for electricity to flow.
Here’s what happens with series wiring:
Voltage adds up. Two 12V panels in series give you 24V. Four panels? 48V. The math is simple – just add the individual panel voltages together.
Current stays the same. If each panel produces 10 amps, your series string still produces 10 amps total. The current doesn’t multiply like voltage does.
One weak panel kills everything. This is the brutal truth about series wiring. If one panel gets shaded or fails, the entire string’s output drops to match the weakest panel. It’s like trying to drive through traffic – you’re only as fast as the slowest car.
Series wiring works best when all your panels are identical and get the same amount of sunlight. Perfect for rooftop installations where shading isn’t an issue.
When Series Makes Sense
Use series wiring when you need higher voltage for your system. Most MPPT controllers work more efficiently with higher input voltages. Plus, higher voltage means lower current, which lets you use thinner wire runs.
If you’ve already done your solar panel sizing calculations, you probably know what voltage your system needs. Series wiring helps you hit those voltage targets without buying expensive high-voltage panels.
Parallel Wiring: The Current Multiplier
Parallel wiring connects all the positive terminals together and all the negative terminals together. Think of it like multiple lanes on a highway – more paths for electricity to flow.
Here’s what parallel wiring does:
Current adds up. Two 10-amp panels in parallel give you 20 amps. Four panels? 40 amps. More panels mean more current output.
Voltage stays the same. Wire four 12V panels in parallel, and you still get 12V. The voltage doesn’t change no matter how many panels you add.
Shading doesn’t kill everything. This is parallel wiring’s superpower. If one panel gets shaded, the others keep producing at full capacity. One weak link doesn’t break the whole chain.
Parallel wiring shines when your panels face different directions or deal with partial shading. It’s also mandatory if you’re mixing different panel types or sizes.
Parallel Wiring Challenges
Parallel wiring isn’t all sunshine and rainbows. You’ll need thicker wires to handle the higher current. Higher current also means more heat and higher risk of fire if you mess up your solar fusing.
Plus, you’ll need a combiner box to safely join all those parallel connections. Don’t cheap out here – a proper solar combiner box prevents your wires from becoming a fire hazard.
Series-Parallel: Best of Both Worlds
Here’s where things get interesting. You don’t have to choose just series or just parallel. Most real-world systems use series-parallel wiring to get the benefits of both methods.
Series-parallel means you wire panels in series strings, then connect those strings in parallel. For example, you might have two strings of three panels each. Each string gives you 36V (3 × 12V), and connecting the strings in parallel doubles your current capacity.
This approach gives you:
Higher voltage from series strings. Better efficiency and thinner wire requirements.
Redundancy from parallel connections. If one string has problems, the other keeps working.
Flexibility for complex installations. Different roof sections or partial shading become manageable.
Planning Your Series-Parallel Layout
Start by grouping panels that get similar sunlight conditions. Each group becomes a series string. Then connect your strings in parallel.
Keep your series strings identical if possible. Mixing different string voltages in parallel creates problems. If you must mix different panels, put similar ones in the same string.
Real-World Wiring Decisions
Your solar array wiring choice depends on your specific situation. Here’s how to decide:
Use series wiring when:
• All panels are identical and unshaded
• You need higher system voltage
• Wire runs are long (reduces voltage drop)
• Your charge controller handles high input voltage
Use parallel wiring when:
• Panels face different directions
• Partial shading is unavoidable
• You’re mixing different panel types
• Your system needs low voltage (12V systems)
Use series-parallel when:
• You have many panels to connect
• You want system redundancy
• Your installation has multiple roof sections
• You need specific voltage and current combinations
Voltage Drop Considerations
Don’t forget about voltage drop in your wire runs. Series wiring’s higher voltage helps fight voltage drop over long distances. But you still need to do the math.
Use a solar wire gauge calculator to make sure your wires can handle the current without excessive voltage drop. Getting this wrong means throwing away power you paid for.
Common Solar Array Wiring Mistakes
I’ve made most of these mistakes so you don’t have to:
Mixing panel types in series. Different panels have different current outputs. The weakest panel limits the whole string.
Ignoring shade patterns. That little bit of morning shade might kill your entire series string’s output.
Undersized wiring. Parallel wiring means higher current. Size your wires accordingly or risk a fire.
Forgetting fusing. Every parallel string needs its own fuse. This isn’t optional.
Mismatched string voltages. Don’t connect a 24V string in parallel with a 36V string. Bad things happen.
Testing Your Wiring
Before you connect everything to your charge controller, test your wiring. Use a multimeter to verify voltage and current outputs match your calculations.
This is where solar load testing becomes crucial. Better to find wiring problems before you smoke expensive equipment.
Tools and Safety for Solar Array Wiring
Solar array wiring isn’t complicated, but it can be dangerous. You’re dealing with electricity that can hurt you and fire risks that can burn down your house.
Always work on your array when it’s covered or during low-light conditions. Sunlight means voltage, and voltage can kill you. Even small residential arrays can produce lethal voltage levels.
Use proper MC4 connectors for all connections. Don’t get creative with wire nuts or electrical tape. MC4 connectors are weatherproof and designed for outdoor solar installations.
Label everything. Trust me on this. Six months from now, you won’t remember which string goes where. Label your strings, your combiner box connections, and your breaker assignments.
Future-Proofing Your Wiring
Plan for expansion when you design your wiring. That small 400W array might grow into a 2000W system someday. Run oversized conduit and leave space in your combiner box for additional strings.
Consider how your battery chemistry choice affects your wiring decisions. Lithium systems often prefer different voltages than AGM systems.
Document your wiring with photos and diagrams. Future you will thank past you when it’s time for maintenance or troubleshooting.
Solar array wiring doesn’t have to be intimidating. Series adds voltage, parallel adds current, and series-parallel gives you both. Match your wiring method to your installation conditions, size your components properly, and test everything before you flip the switch.
Most importantly, don’t rush this part. Good wiring is invisible when it works and obvious when it doesn’t. Take the time to do it right the first time.