Your solar array doesn’t need to become a bonfire to teach you about solar fusing. Trust me, I learned this the expensive way when my first DIY system turned into a very costly lesson in electrical safety. That little $5 fuse I skipped? It would’ve saved me a $500 charge controller and a weekend of explaining to my spouse why the garage smelled like burnt electronics.
Nobody talks about fuses until something goes wrong. Then suddenly, everyone’s an expert on overcurrent protection. Let’s fix that before your system teaches you the hard way.
Why Solar Fusing Matters More Than You Think
DC electricity doesn’t mess around. Unlike AC power that crosses zero 60 times per second, DC current flows continuously in one direction. When something goes wrong – like a wire short or component failure – that current keeps flowing until something stops it.
Without proper solar fusing, that “something” could be your charge controller melting. Or your battery bank catching fire. Or your RV’s electrical system becoming a very expensive pile of charcoal.
Here’s the thing: your panels can produce current even in low light. I’ve measured 3 amps from a 100-watt panel on an overcast day. Multiply that by however many panels you have in parallel, and suddenly that “small” current becomes significant.
The Real Cost of Skipping Fuses
A quality MPPT charge controller costs $150-400. A lithium battery bank can run $800-2000. Your entire system could easily represent $3000-5000 in components.
A fuse costs $5. Do the math.
I know someone who lost a $350 charge controller because they “temporarily” skipped the fuse installation. That temporary setup lasted six months until a loose wire created a dead short. The controller died instantly.
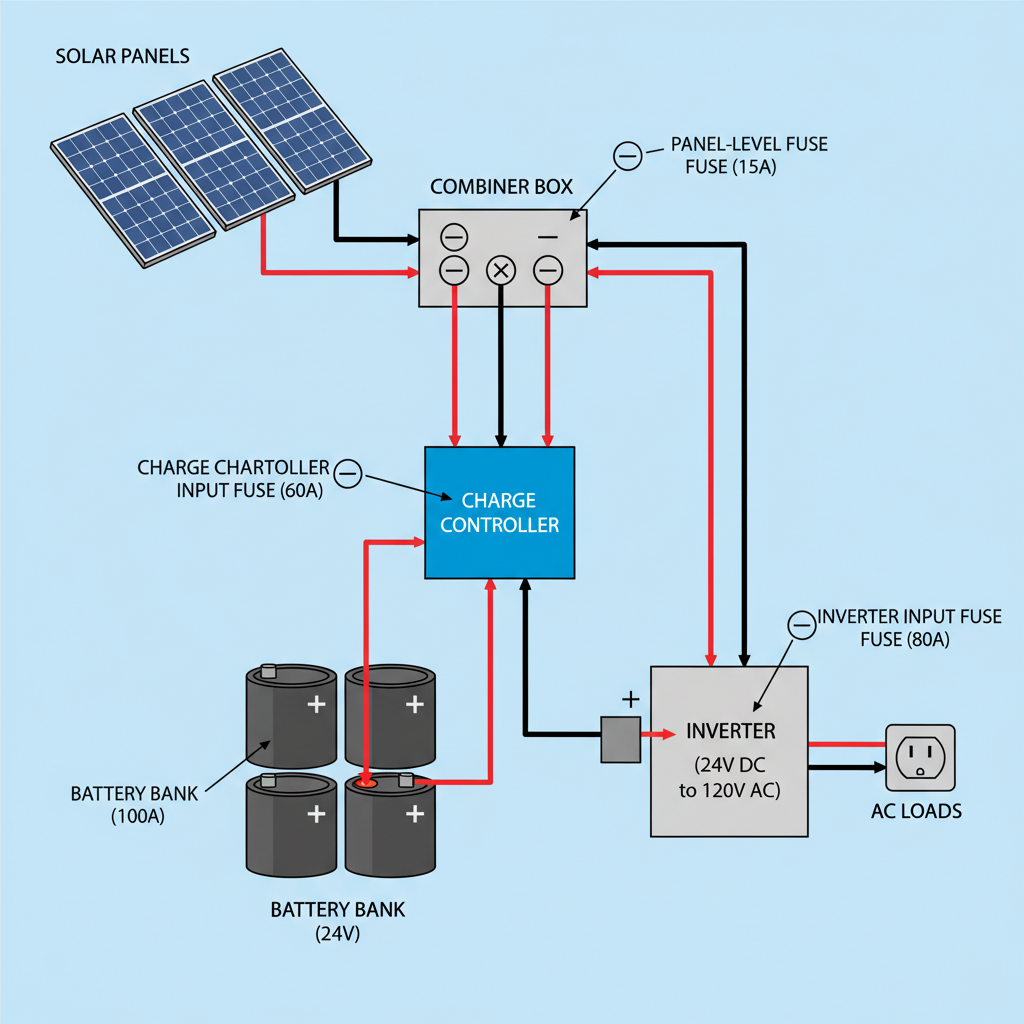
Where to Place Solar Fuses in Your System
Every current-carrying wire needs overcurrent protection. But in solar systems, some locations are more critical than others.
Panel-Level Fusing
Each panel string needs its own fuse before combining with other strings. This protects against reverse current flow when one string fails or gets shaded.
Place these fuses in a solar combiner box near your panels. Use fuses rated 125% of your panel’s short-circuit current (Isc). For most residential panels, that’s 15-20 amp fuses.
Battery Bank Fusing
This is the big one. Your battery bank can deliver hundreds of amps in a fault condition. A dead short here creates enough heat to start fires and melt copper.
Install a fuse or breaker within 7 inches of your battery positive terminal. For lithium batteries, this fuse should match your Battery Management System (BMS) rating. For AGM batteries, use 125% of your maximum expected load current.
Charge Controller Input Fusing
Your MPPT controller’s input needs protection too. This fuse should match the controller’s maximum input current rating. Check your controller’s manual – it’s usually 40-100 amps depending on the model.
Don’t rely on your MPPT controller’s internal protection. It’s designed to protect the controller, not your wiring or panels.
Choosing the Right Solar Fuse Amperage
Fuse sizing isn’t rocket science, but getting it wrong creates problems. Too small, and you’ll blow fuses constantly. Too large, and they won’t protect anything.
Here’s my simple formula: Start with your maximum expected current, then multiply by 125%. This gives you headroom for normal variations while still providing protection.
Panel String Fusing
Find your panel’s short-circuit current (Isc) on the spec sheet. Multiply by 1.25. Round up to the nearest standard fuse size.
Example: Panel Isc = 10.5 amps
10.5 × 1.25 = 13.1 amps
Use a 15-amp fuse
Battery Bank Fusing
This depends on your system size. For most DIY systems, calculate your maximum load current and add 25%.
If you sized your system for 2000 watts at 12 volts, that’s 167 amps maximum. Add 25% for headroom: 167 × 1.25 = 209 amps. Use a 200 or 225-amp fuse.
For larger systems, consult your battery manufacturer’s recommendations. They know their cells better than anyone.
DC Fuse Types: What Actually Works
Not all fuses are created equal. AC fuses and DC fuses handle current differently. Using the wrong type is like wearing a bicycle helmet in a car crash – better than nothing, but not what you want to rely on.
ANL Fuses
These are my go-to for battery bank protection. They’re designed for high-current DC applications and interrupt current cleanly. Available from 40-500 amps.
ANL fuses fit in compact holders and cost $3-8 each. They’re reliable and widely available. Perfect for most DIY systems.
Class T Fuses
For serious current protection (200+ amps), Class T fuses offer superior performance. They’re more expensive ($15-30 each) but interrupt current faster and more reliably than ANL fuses.
If your battery bank can deliver 400+ amps in a fault condition, invest in Class T fuses.
Blade Fuses
Good for low-current applications like panel strings or small loads. Cheap, readily available, and easy to replace. Use automotive-style ATC or ATO fuses for currents up to 40 amps.
Solar Fuse Installation: Getting It Right
Proper installation matters as much as choosing the right fuse. I’ve seen perfectly good fuses fail because they were installed incorrectly.
Connection Quality
Every connection creates resistance. Resistance creates heat. Heat kills fuses (and everything else).
Use proper crimping tools for all connections. No twist-and-tape joints. No “temporary” wire nuts. If you calculated your wire gauge correctly, don’t ruin it with poor connections.
Fuse Holder Selection
The holder is as important as the fuse. Cheap plastic holders fail in UV light and high temperatures. Invest in quality fuse holders with heavy-duty contacts.
For outdoor installations, use weatherproof enclosures. Water and electricity don’t mix, especially in DC systems where corrosion happens faster.
Accessibility
You’ll need to replace fuses eventually. Don’t bury them behind panels or inside walls. Plan for easy access when (not if) you need to service them.
Testing Your Solar Fuse Protection
Installation is only half the battle. You need to verify your fuses actually work when needed.
Here’s a simple test: With your system shut down, temporarily create a controlled short circuit downstream of each fuse. The fuse should blow immediately. If it doesn’t, you have a sizing or installation problem.
Never test fuses under load or with the system energized. This is dangerous and unnecessary. Load testing your system is different from testing overcurrent protection.
Regular Fuse Inspection
Check your fuses during regular system maintenance. Look for:
- Discolored or corroded contacts
- Loose connections
- Signs of overheating
- Cracked fuse holders
Replace anything that looks questionable. Fuses are cheap insurance against expensive failures.
Common Solar Fusing Mistakes
Every mistake I’ll mention here, I’ve either made myself or watched someone else make. Learn from our expensive lessons.
Using AC-Rated Fuses
AC fuses aren’t designed for DC current interruption. They might work temporarily, but they won’t reliably protect your system. Spend the extra $2 for proper DC fuses.
Oversizing “For Safety”
A 100-amp fuse doesn’t make your 40-amp system “extra safe.” It makes it unprotected. Size fuses correctly or don’t bother installing them.
Skipping Panel-Level Fuses
“I only have two panels, I don’t need individual fuses.” Wrong. Even two panels can create dangerous reverse current conditions. Fuse every string.
Installing Fuses on the Wrong Side
Always install fuses on the positive conductor, as close to the source as possible. Fusing the negative side creates ground fault hazards.
The Bottom Line on Solar System Protection
Your DIY solar system represents a significant investment in time and money. Solar fusing is the cheapest insurance you can buy to protect that investment.
Yes, it adds complexity to your installation. Yes, it costs extra money upfront. But compared to replacing a fried charge controller or explaining to your insurance company why your RV burned down, fuses are a bargain.
Start with the basics: fuse every panel string, fuse your battery bank, and fuse your charge controller input. Use proper DC-rated components and size them correctly. The $50 you spend on fuses today could save you thousands later.
Don’t be like me and learn this lesson the expensive way. Your solar system – and your wallet – will thank you.