
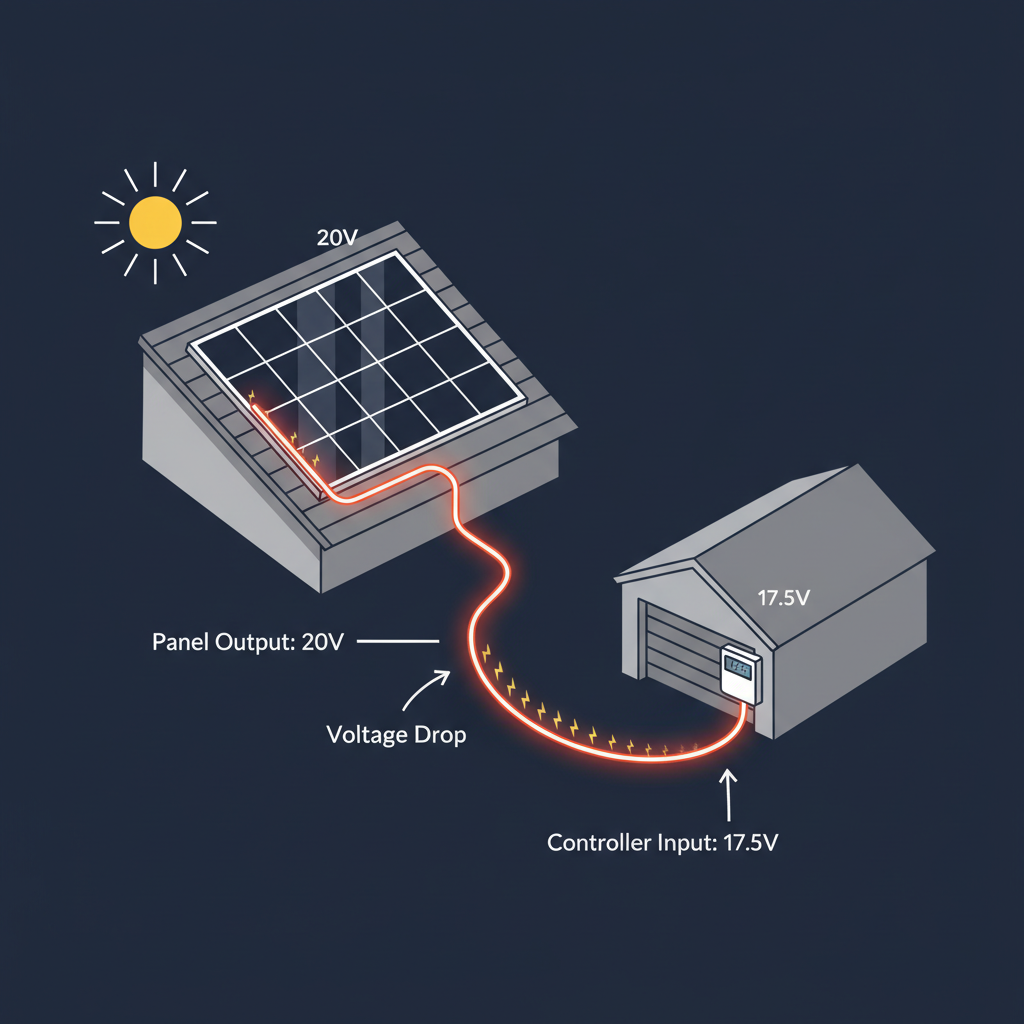
Here’s something nobody told me when I installed my first solar setup: the wire run between my panels and my charge controller was stealing my power. Not dramatically. Not all at once. Just quietly, every single day, like a slow leak in a tire. Solar panel voltage drop is one of those invisible problems that costs real money, and most beginners never even know it’s happening.
If you’ve ever wondered why your system isn’t producing what the spec sheet promised, this might be why. Let’s fix that.
What Is Solar Panel Voltage Drop, Exactly?
Every wire has resistance. It’s physics – you can’t argue with it. When current flows through a wire, some of that electrical energy gets converted to heat instead of doing useful work. The longer the wire, the more resistance. The more resistance, the more voltage you lose before it ever reaches your charge controller.
That lost voltage is called voltage drop. And in a solar system, it’s a bigger deal than most people realize.
Here’s a simple example. Say your panels are putting out 20 volts. By the time that power travels 50 feet of undersized wire to your charge controller, you might only have 18.5 volts arriving. That 1.5-volt drop sounds small. But it represents lost watts – and lost watts every hour of every sunny day adds up fast.
The formula itself isn’t scary. Voltage drop equals current (amps) multiplied by resistance (ohms). Wire resistance is measured in ohms per foot, and it goes up with length and down with wire thickness. That’s really all the physics you need to know to understand the problem.
Why Distance Is the Real Enemy
Most people think wire gauge is the main variable. It matters, but distance matters just as much. Double the wire run, double the resistance, double the voltage drop. It scales linearly, which means a 100-foot run is twice as punishing as a 50-foot run – even with identical wire.
This is why your installation layout decisions matter before you buy a single foot of cable. I learned this the hard way when I mounted my charge controller on the wrong wall. My panel-to-controller run ended up being 60 feet instead of 20. The fix cost me more in wire upgrades than moving the controller would have.
And remember – it’s a round trip. Current has to flow out and back. So a 30-foot physical distance means 60 feet of actual wire resistance. Beginners almost always forget to double the run when calculating. I did, more than once.
For a deeper look at calculating this properly, check out our guide on DIY Solar Voltage Drop: Calculate Wire Runs That Work. It walks through the math step by step without making you feel like an idiot.
How Much Voltage Drop Is Too Much?
The industry standard recommendation is to keep voltage drop under 3% for the wire run from your panels to your charge controller. Some installers push for 2% or less. I’d aim for 2% if you can manage it without spending a fortune.
Let’s put numbers to that. If your panel array output is 24 volts, 3% of 24 is 0.72 volts. That’s your maximum acceptable drop across the entire run. Anything beyond that and you’re leaving real energy on the table.
To calculate whether your current setup exceeds that threshold, you need three things: your wire gauge, your wire run length (doubled), and your system’s operating current in amps. Plug those into a voltage drop calculator or use the formula, and you’ll know exactly where you stand.
Our Solar Wire Gauge Calculator guide has everything you need to figure out the right wire size for your specific run. Seriously, use it before you buy wire. Future-you will appreciate it.
The Fix: Bigger Wire or Shorter Run?
Here’s where it gets interesting – and where most guides fail you by only talking about wire gauge.
Yes, you can reduce solar panel voltage drop by using thicker wire. Going from 10 AWG to 8 AWG roughly halves the resistance per foot. Going to 6 AWG cuts it further. But wire gets expensive fast, especially in larger gauges. And heavy wire is a pain to route and terminate.
The alternative – and often the smarter move – is to physically shorten the distance between your panels and your charge controller. Moving your controller closer to the panels, even by 15 or 20 feet, can solve a voltage drop problem that would otherwise require an expensive wire upgrade.
Do the math on both options before you decide. Here’s a rough comparison:
- Option A: Upgrade 60 feet of wire from 10 AWG to 6 AWG – costs more in materials, harder to install.
- Option B: Move the charge controller 20 feet closer, reducing your run to 40 feet, and stay with 8 AWG – cheaper and easier.
This is not a trick question. Option B wins in a lot of real-world scenarios. Evaluate both before you open your wallet.
Higher Voltage Systems Drop Less Power
There’s another lever you can pull, and it’s a big one: system voltage.
Voltage drop as a percentage is much less painful in a 48-volt system than a 12-volt system. Here’s why. If you lose 1 volt in a 12-volt system, that’s an 8.3% drop – terrible. Lose 1 volt in a 48-volt system, that’s only 2.1% – manageable.
This is one of the core reasons serious off-grid and home backup systems use 48-volt architectures. Longer wire runs become viable. Wire gauge requirements drop. Efficiency goes up. It’s not just about battery compatibility – it’s about physics working in your favor instead of against you.
If you’re still planning your system and haven’t committed to a voltage yet, this is worth factoring in early. Our guide on Solar Panel Sizing: Calculate Your Power Needs touches on how system voltage affects your overall design decisions.
Practical Tips to Minimize Voltage Drop
Let’s get concrete. Here’s what actually works:
Plan Your Layout Before You Install
Sketch your system on paper before you buy anything. Know where your panels will be, where your charge controller will live, and measure the actual wire path – not straight-line distance. Conduit bends, wall routes, and floor penetrations all add length. Account for every foot.
Always Double Your Physical Distance
Your voltage drop calculation needs total wire length, not just one-way distance. A panel 25 feet from the controller means 50 feet of wire. This mistake is so common it should be printed on every spool of solar wire sold. It’s not. So remember it yourself.
Upsize Wire on Long Runs
If you’re running more than 30 feet one-way and your system operates at 12 volts, go up at least one wire gauge from what the ampacity chart says. The extra cost is real but the performance difference is also real. Check your calculations using the DIY Solar Voltage Drop calculator first so you’re not guessing.
Use Quality Connectors and Terminations
Loose or corroded connections add resistance at every junction. A bad MC4 connector or a poorly crimped lug can add measurable voltage drop all by itself. Use proper connectors, crimp correctly, and inspect your terminations. This is boring advice. It’s also true.
Check Your MPPT Settings
Some MPPT controllers allow you to compensate for wiring losses in their configuration. It’s not a fix for terrible wire runs, but it’s worth knowing about. Our guide on MPPT Controller Settings: 5 That Actually Matter covers the settings that actually move the needle.
The Bottom Line on Solar Panel Voltage Drop
Solar panel voltage drop is not dramatic. Your system won’t explode. Your panels won’t stop working. It just silently underperforms every day, and you never quite get what you paid for.
The fix is usually simpler than people expect. Measure your runs. Do the math. Consider moving your equipment before buying expensive heavy-gauge wire. And if you’re still in the planning stage, factor distance into your layout from the start – it’s a lot easier to move a controller location on paper than after you’ve run the conduit.
You don’t need an engineering degree to get this right. You just need to know it matters. Now you do.
Related Reading
For related tips, check out our wire gauge guide. For code requirements on conductor sizing, see the National Electrical Code (NFPA 70) reference.